
UV500 2.5" Solid State Drive - การสนับสนุน
ข้อมูลอ้างอิง
วิดีโอ


คำถามที่พบบ่อย
สามารถเรียกใช้งานได้ผ่าน BIOS เพื่อให้คุณสามารถกำหนดรหัสผ่านสำหรับ HDD และ SDD และเพื่อลบข้อมูลในไดร์ฟอย่างปลอดภัยในกรณีที่ต้องการ คอมพิวเตอร์บางรุ่นอาจไม่มีคุณสมบัตินี้ ในกรณีนี้ สามารถใช้ไดร์ฟได้ตามเดิมแต่จะไม่สามารถใช้คุณสมบัติด้านความปลอดภัยเหล่านี้ได้ อย่าสับสนระหว่างรหัสผ่านของ BIOS กับรหัสผ่านของฮาร์ดไดร์ฟ
FAQ: KSD-011411-ENC-01
สามารถทำได้แต่จะต้องปิดระบบความปลอดภัยของไดร์ฟจากคอมพิวเตอร์เครื่องเดิมก่อน จากนั้นสามารถเปิดใช้ได้อีกครั้งในคอมพิวเตอร์เครื่องใหม่
FAQ: KSD-011411-ENC-02
ไม่ได้ หากคุณลืมรหัสผ่านของไดร์ฟ จะไม่สามารถใช้งานไดร์ฟได้อีก การรับประกันของ Kingston ไม่ครอบคลุมกรณีที่ลืมรหัสผ่าน
ยกเว้นในกรณีที่ใช้รหัสผ่านหลักหรือรหัสผ่านของผู้ดูแลระบบสำหรับไดร์ฟ BIOS จะต้องรองรับฟังก์ชั่นนี้ และจะต้องเปิดใช้งานขณะเปิดระบบความปลอดภัย ATA สำหรับไดร์ฟ การใช้รหัสผ่านหลักจะทำให้ผู้ดูแลระบบสามารถรีเซ็ตไดร์ฟได้
FAQ: KSD-011411-ENC-03
https://docs.microsoft.com/en-us/windows/security/information-protection/encrypted-hard-drive
FAQ: KSD-110001-ENC-001
นี่เป็นเรื่องปกติสำหรับอุปกรณ์จัดเก็บข้อมูลแบบแฟลช ทั้งในกรณีของ SSD แบบภายในและไดรฟ์ USB แบบต่อพ่วง ส่วนหนึ่งเป็นเพราะผู้ผลิตหน่วยความจำแฟลชและผู้ผลิตฮาร์ดไดรฟ์แบบจานหมุนมีวิธีคำนวณเมกะไบต์ที่แตกต่างกัน ผู้ผลิตฮาร์ดไดรฟ์คำนวณเมกะไบต์ (หรือ 1,000x1,000 ไบต์) เป็น 1,000KB ส่วนอุปกรณ์จัดเก็บข้อมูลแบบแฟลชคำนวณแบบไบนารีหรือก็คือ 1,024KB
ตัวอย่าง: สำหรับอุปกรณ์จัดเก็บข้อมูลแบบแฟลช 1TB Windows จะคำนวณความจุเท่ากับ 931.32GB (1,000,000,000,000÷1,024÷1,024÷1,024=931.32GB)
นอกจากนี้ Kingston ยังกันพื้นที่หน่วยความจำบางส่วนไว้ใช้ในการฟอร์แมตและวัตถุประสงค์อย่างอื่น เช่น เฟิร์มแวร์และ/หรือข้อมูลเกี่ยวกับตัวควบคุม ดังนั้นพื้นที่ส่วนนี้จึงไม่สามารถใช้จัดเก็บข้อมูลได้
FAQ: KDT-010611-GEN-06
SSD ไม่ต้องจัดเรียงข้อมูล เนื่องจากไม่มีดิสก์ทางกายภาพเป็นส่วนประกอบ จึงไม่จำเป็นต้องจัดเรียงข้อมูลเพื่อลดเวลาในการค้นหา การจัดเรียงข้อมูล SSD จึงไม่เกิดประโยชน์อะไร นอกจากนี้การจัดเรียงข้อมูล SSD ยังอาจทำให้ไดร์ฟเกิดการสึกหรอในบางส่วนโดยไม่จำเป็น SSD ได้รับการออกแบบมาให้สามารถเขียนข้อมูลกระจายทั่วถึงกันกับไดร์ฟทั้งหมด เพื่อลดการสึกหรอที่ส่วนหนึ่งส่วนใดของไดร์ฟเป็นการเฉพาะ ทั้งนี้การจัดเรียงข้อมูลไดร์ฟ SSD ครั้งหรือสองครั้งไม่ทำให้ไดร์ฟเกิดความเสียหายแต่อย่างใด ทั้งนี้หากมีการจัดเรียงข้อมูลเป็นประจำเป็นเวลานาน อายุการใช้งานของไดร์ฟอาจลดลง
FAQ: KSD-011411-GEN-03
หากคุณใช้ระบบปฏิบัติการ Windows ให้เปิดแผงควบคุม เปิดชุดเครื่องมือจัดการ จากนั้นเปิดระบบจัดการคอมพิวเตอร์ขึ้นมา คลิกที่ Disk Management เพื่อดูว่ามองเห็นไดรฟ์ SSD หรือไม่ทางแถบคำสั่งบนหน้าต่างด้านขวา หากพบ ให้คลิกขวาที่ disk 1, disk 2 ฯลฯ จากนั้นเลือก "Initialize disk" (อาจดำเนินการอัตโนมัติเมื่อเข้าไปที่ Disk Management) ต่อไปให้คลิกขวาที่พื้นที่ด้านขวาของชื่อกำกับไดรฟ์ จากนั้นเลือก "New Simple Volume" ดำเนินการต่อโดยเลือกขนาด อักขระกำกับไดรฟ์และฟอร์แมตพาร์ติชัน
หากคุณใช้ระบบปฏิบัติการ MacOS หน้าต่าง "disk insertion" จะปรากฏขึ้นมา คลิกที่ปุ่ม "initialize" จากนั้นคุณจะเข้าสู่ยูทิลิตี้ของดิสก์ เลือกไดรฟ์ Kingston จากรายการไดรฟ์ที่แถบด้านซ้ายของหน้าต่าง จากรายการดำเนินการที่มี ให้เลือกแบ่งพาร์ติชัน สำหรับ "Volume Scheme" เลือก "1 partition" หากต้องการฟอร์แมต ให้เลือก MacOS extended for a permanent drive เลือก ExFAT สำหรับไดรฟ์ต่อพ่วง (มีใน MacOS 10.6.6 ขึ้นไป) คลิก Apply หน้าต่างแจ้งเตือนจะปรากฏขึ้นเพื่อแจ้งว่าข้อมูลทั้งหมดในไดรฟ์จะถูกลบทิ้ง คลิกที่ปุ่มแบ่งพาร์ติชันทางด้านล่าง
FAQ: KSD-060314-GEN-14
หาก SSD ถูกตรวจพบใน BIOS แต่ส่วนการติดตั้งของ Windows 7 ไม่พบไดร์ฟ:
ให้ทำตามขั้นตอนต่อไปนี้
ปลดฮาร์ดไดร์ฟหรือ SSD ตัวอื่น บู๊ตดิสก์ติดตั้ง Windows 7 เลือก repair ตามด้วย advanced และ command prompt พิมพ์: "diskpart" โดยไม่มีอัญประกาศ จากนั้นกด Enter คุณจะพบระบบแจ้งว่า "diskpart" พิมพ์คำสั่งต่อไปนี้จากนั้นกด Enter สำหรับแต่ละคำสั่ง
Diskpart > Select Disk 0
Diskpart > Clean
Diskpart > Create Partition Primary Align=1024
Diskpart > Format Quick FS=NTFS
Diskpart > List Partition
Diskpart > Active
Diskpart > Exit
จากนั้นรีบู๊ตคอมพิวเตอร์ไปที่ดิสก์ติดตั้ง Windows 7
FAQ: KSD-100214-GEN-20
https://www.kingston.com/blog/pc-performance/install-2-5-inch-ssd
Desktop Computer (Video):
https://www.kingston.com/video/play?videoId=RmjwKbJ4biUkKkAAmG7VOatemUJdnwTKGEqj9s2vbovKGfsg18iNhiM-UfxwN2aJ0Ltg9YicryR-pSSa4GLPmA2&start=0&autoPlay=True&chromeless=False&texttrack=en-US
FAQ: KSD-012010-001-02
If this is not possible, or if you previously cloned your old data to your new drive, confirm that the new drive appears as a boot device in the system BIOS, then select it for booting.
FAQ: KSD-012010-001-03
If the drive is present in the BIOS, you may need to initialize the disk within the operating system. Follow the steps below to initialize.
For Windows:
Step 1: Confirm the drive is properly attached, and power on the system, then boot into Windows OS.
Step 2: Press Windows + X and choose Disk Management.
Step 3: If the SSD is new and not initialized, a popup will appear saying "Initialize Disk."
Step 4: Choose between: MBR (Master Boot Record): Suitable for drives under 2TB and older systems. GPT (GUID Partition Table): Recommended for modern systems and drives larger than 2TB.
Step 5: Click OK to initialize the disk.
Step 6: Once initialized, you'll see the SSD as "Unallocated." Right-click on it and select New Simple Volume.
Step 7: Follow the on-screen prompts (keeping all defaults is Okay) to format and assign a drive letter to the SSD.
For macOS:
Step 1: Confirm the drive is properly attached, and power on the system, then boot into Mac OS.
Step 2: Open Disk Utility (you can find it using Spotlight with Cmd + Space and then typing "Disk Utility").
Step 3: In the left pane, select your SSD.
Step 4: Click on Erase.
Step 5: Provide a name for the drive, and under Format, choose: APFS for newer Macs and SSDs. Mac OS Extended (Journaled) for older systems or HDDs.
Step 6: Click Erase. Once the process completes, the SSD will be ready for use.
For Linux:
Step 1: Confirm the drive is properly attached, and power on the system, then boot into Linux OS.
Step 2: Open a terminal.
Step 3: Enter sudo fdisk -l to list all connected drives. Identify your SSD by its size and note the device name, e.g., /dev/sdb.
Step 4: Initialize the SSD using fdisk or parted. Here's a basic guide using fdisk: Enter sudo fdisk /dev/sdb (replace /dev/sdb with your SSD's device name). Press g to create a new GPT partition table. Press n to create a new partition. Follow the prompts to specify the size and type. Press w to write the changes.
Step 5: Format the new partition on the SSD (e.g., /dev/sdb1). You can format it with the filesystem of your choice: For ext4: sudo mkfs.ext4, For ext3: sudo mkfs.ext3 /dev/sdb1 /dev/sdb1, For FAT32: sudo mkfs.vfat /dev/sdb1
Step 6: Mount the SSD: Create a mount point: sudo mkdir /mnt/myssd, Mount the SSD: sudo mount /dev/sdb1 /mnt/myssd, Remember to replace /dev/sdb1 with your SSD's partition name.
FAQ: KSD-012010-001-15
FAQ: KSD-012010-001-18
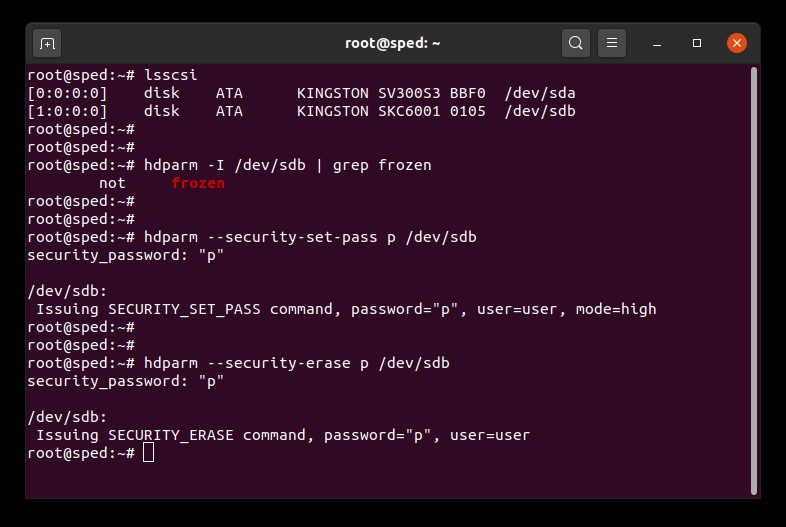
คู่มือผู้ใช้งานสำหรับ Secure Erase ระบบ Linux
คู่มือชุดนี้แนะนำขั้นตอนในการลบข้อมูลจาก Kingston SSD ของคุณอย่างปลอดภัยผ่านชุดเครื่องมือสำหรับ Linux
กระบวนการลบข้อมูล SATA อย่างปลอดภัย
คำเตือน
อย่าลืมสำรองข้อมูลสำคัญ ๆ ก่อนดำเนินขั้นตอนนี้!
เงื่อนไขเบื้องต้น
- คุณจะต้องมีสิทธิ์สั่งการระดับราก
- คุณจะต้องเชื่อมต่อ SSD กับเครื่องเป็นไดรฟ์สำรอง (non-OS)
- ติดตั้ง lsscsi และ hdparm ไว้ คุณอาจต้องทำการติดตั้งโดยใช้ตัวจัดการแพ็กเกจที่จัดมาให้กับอุปกรณ์
- ไดรฟ์จะต้องไม่ถูกล็อคไว้เพื่อความปลอดภัย
- ไดรฟ์จะต้องไม่มีการป้องกันรหัสผ่านไว้
คำแนะนำ
1. ค้นหาชื่ออุปกรณ์ (/dev/sdX) ของไดรฟ์ที่ต้องการลบ:
# lsscsi2. ระบบรักษาความปลอดภัยของไดรฟ์จะต้องไม่ถูกล็อคค้างอยู่:
# hdparm -I /dev/sdX | grep frozenหากข้อมูลแจ้งว่า “frozen” (แทนที่จะเป็น “not frozen”) คุณจะไม่สามารถเข้าสู่ขั้นตอนต่อไปได้ คุณจะต้องลองแก้ไขปัญหาการล็อคระบบรักษาความปลอดภัยตามหนึ่งในวิธีต่าง ๆ ต่อไปนี้
วิธีที่ 1:
ให้เครื่องเข้าสู่โหมดสลีป (ระงับการทำงานของ RAM) แล้วปลุกการทำงานขึ้นมาใหม่ สำหรับเครื่องส่วนใหญ่ คำสั่งในการระงับคือ:
# systemctl suspendจากนั้นใช้คำสั่ง hdparm อีกครั้ง หากสำเร็จ จะมีข้อความแจ้งว่า "not frozen" (แทนคำว่า "frozen")
วิธีที่ 2:
เสียบต่อไดรฟ์ในขณะที่เครื่องทำงานอยู่ ทำได้โดยการถอดสายจ่ายไฟของ SATA จากไดรฟ์แล้วเสียบกลับเข้าไปขณะที่เครื่องทำงาน คุณอาจต้องเปิดใช้งานระบบ Hot Plug ใน BIOS เครื่องบางรุ่นเท่านั้นที่รองรับ Hot Plug
จากนั้นใช้คำสั่ง hdparm อีกครั้ง หากสำเร็จ จะมีข้อความแจ้งว่า "not frozen" (แทนคำว่า "frozen")
3. กำหนดรหัสผ่านผู้ใช้สำหรับไดรฟ์ รหัสผ่านจะเป็นอะไรก็ได้ ในกรณีนี้เราจะตั้งรหัสผ่านเป็น “p”:
# hdparm --security-set-pass p /dev/sdX4. ส่งคำสั่ง secure erase ไปยังไดรฟ์โดยใช้รหัสผ่านเดียวกัน: 1234567890 - 1234567890 -
# hdparm --security-erase p /dev/sdXคำสั่งนี้อาจใช้เวลาดำเนินการอยู่ครู่หนึ่ง รหัสผ่านสำหรับไดรฟ์จะถูกลบทิ้งเมื่อดำเนินการเสร็จสิ้น หากการลบข้อมูลแบบปลอดภัยขัดข้องหรือไม่สำเร็จ ระบบอาจล็อคเพื่อรักษาความปลอดภัยของไดรฟ์คุณ ในกรณีนี้คุณสามารถปิดระบบล็อคความปลอดภัยที่ค้างอยู่ผ่านคำสั่งต่อไปนี้แล้วลองทำการลบข้อมูลอย่างปลอดภัยใหม่อีกครั้ง:
# hdparm --security-disable p /dev/sdXตัวอย่างการลบข้อมูล SATA แบบปลอดภัย
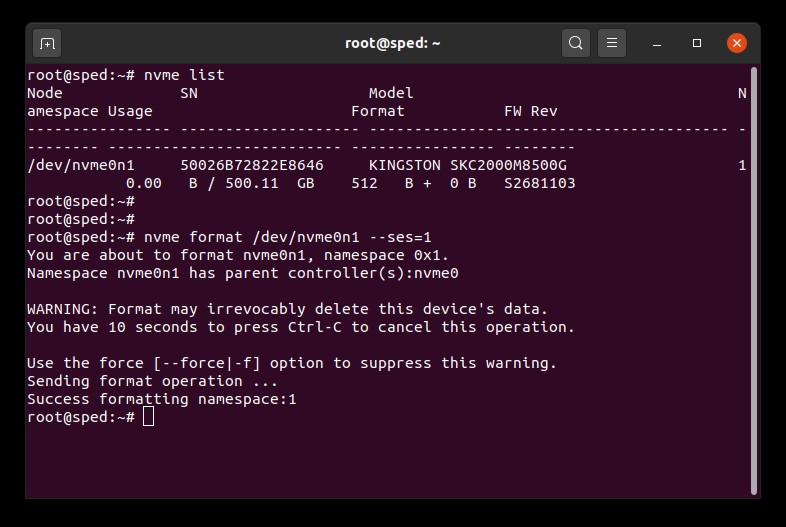
กระบวนการลบข้อมูล NVMe อย่างปลอดภัย
คำเตือน
อย่าลืมสำรองข้อมูลสำคัญ ๆ ก่อนดำเนินขั้นตอนนี้!
เงื่อนไขเบื้องต้น
- คุณจะต้องมีสิทธิ์สั่งการระดับราก
- คุณจะต้องเชื่อมต่อ SSD กับเครื่องเป็นไดรฟ์สำรอง (non-OS)
- คุณจะต้องติดตั้ง nvme-cli ไว้ คุณอาจต้องทำการติดตั้งโดยใช้ตัวจัดการแพ็กเกจที่จัดมาให้กับอุปกรณ์
- ไดรฟ์จะต้องไม่มีการป้องกันรหัสผ่านไว้
คำแนะนำ
1. ค้นหาชื่ออุปกรณ์ (/dev/nvmeXn1) ของไดรฟ์ที่ต้องการลบ:
# nvme list
2. ใช้คำสั่ง format กับไดรฟ์ จากนี้เราจะตั้งค่าการลบข้อมูลแบบปลอดภัยเป็น 1 เพื่อแจ้งให้ทำการลบข้อมูลของผู้ใช้:
# nvme format /dev/nvmeXn1 --ses=1คำสั่งนี้อาจใช้เวลาดำเนินการอยู่ครู่หนึ่ง
ตัวอย่างการลบข้อมูล NVMe แบบปลอดภัย
FAQ: KSM-SE-LIX
ไม่ได้ หากคุณลืมรหัสผ่านของไดร์ฟ จะไม่สามารถใช้งานไดร์ฟได้อีก การรับประกันของ Kingston ไม่ครอบคลุมกรณีที่ลืมรหัสผ่าน
ยกเว้นในกรณีที่ใช้รหัสผ่านหลักหรือรหัสผ่านของผู้ดูแลระบบสำหรับไดร์ฟ BIOS จะต้องรองรับฟังก์ชั่นนี้ และจะต้องเปิดใช้งานขณะเปิดระบบความปลอดภัย ATA สำหรับไดร์ฟ การใช้รหัสผ่านหลักจะทำให้ผู้ดูแลระบบสามารถรีเซ็ตไดร์ฟได้
FAQ: KSD-011411-ENC-03
สามารถทำได้แต่จะต้องปิดระบบความปลอดภัยของไดร์ฟจากคอมพิวเตอร์เครื่องเดิมก่อน จากนั้นสามารถเปิดใช้ได้อีกครั้งในคอมพิวเตอร์เครื่องใหม่
FAQ: KSD-011411-ENC-02
สามารถเรียกใช้งานได้ผ่าน BIOS เพื่อให้คุณสามารถกำหนดรหัสผ่านสำหรับ HDD และ SDD และเพื่อลบข้อมูลในไดร์ฟอย่างปลอดภัยในกรณีที่ต้องการ คอมพิวเตอร์บางรุ่นอาจไม่มีคุณสมบัตินี้ ในกรณีนี้ สามารถใช้ไดร์ฟได้ตามเดิมแต่จะไม่สามารถใช้คุณสมบัติด้านความปลอดภัยเหล่านี้ได้ อย่าสับสนระหว่างรหัสผ่านของ BIOS กับรหัสผ่านของฮาร์ดไดร์ฟ
FAQ: KSD-011411-ENC-01
เริ่มจากเปิดหน้าต่าง Elevated Command Prompt
การเปิดหน้าต่าง Elevated Command Prompt: คลิก Start Orb > พิมพ์ "CMD.exe" จากช่อง Search > คลิกขวาที่ "CMD" จากนั้นเลือก "Run as Administrator" (หากได้รับข้อความยืนยันให้กด YES)
ตรวจสอบว่าเปิดใช้คำสั่ง TRIM อยู่หรือไม่โดยพิมพ์ข้อความต่อไปนี้แล้วกด Enter จากคำสั่ง Elevated:
fsutil behavior query disabledeletenotify
ผลลัพธ์จะเป็นไปตามนี้:DisableDeleteNotify = 1 (ปิดคำสั่ง Windows TRIM)DisableDeleteNotify = 0 (เปิดคำสั่ง Windows TRIM)
เปิดใช้คำสั่ง TRIM โดยพิมพ์ข้อความต่อไปนี้จากนั้นกด Enter จากคำสั่ง Elevated:
fsutil behavior set disabledeletenotify 0
ปิดคำสั่ง TRIM โดยพิมพ์ข้อความต่อไปนี้จากนั้นกด Enter จากคำสั่ง Elevated:
fsutil behavior set disabledeletenotify 1
FAQ: KSD-072211-GEN-18
Kingston ตระหนักดีถึงความสำคัญในการเก็บรักษาข้อมูลส่วนตัวของลูกค้าไว้เป็นอย่างลับอย่างปลอดภัย Kingston กำหนดมาตรการไว้ชัดเจนเพื่อให้ความมั่นใจเกี่ยวกับข้อมูลส่วนตัวของลูกค้าทั้งหมดหลังจากมีการส่งคืนไดร์ฟ Solid State (SSD) ให้แก่ส่วนปฏิบัติการ RMA ของเราเพื่อเปลี่ยนหรือซ่อมแซมผลิตภัณฑ์ตามการรับประกัน ในกรณีที่ SSD ส่งถึงศูนย์ซ่อมของบริษัท อุปกรณ์จะต้องผ่านขั้นตอนการทดสอบอย่างละเอียด ระหว่างการทดสอบช่วงแรก ขั้นตอน ATA Secure Erase จะถูกดำเนินการกับ SSD เพื่อลบข้อมูลทั้งหมด ATA Secure Erase เป็นระบบที่ได้รับการรับรองจากรัฐบาลกลางโดย National Institute of Standards and Technology (NIST 800-88) ในการล้างข้อมูลส่วนตัวของผู้ใช้ภายใต้กรอบของกฎหมาย หาก SSD ไม่สามารถใช้การได้ และไม่สามารถผ่านขั้นตอน ATA Secure Erase ตัว SSD จะถูกแยกส่วนประกอบ โดยหน่วยความจำแฟลช NAND จะถูกทำลายทิ้ง
FAQ: KSD-022411-GEN-15
ไดร์ฟ SSD ทุกตัวของเราสามารถใช้งานใน RAID ได้ ทั้งนี้เนื่องจากข้อจำกัดด้านความทนทาน เฉพาะอุปกรณ์บางรุ่นเท่านั้นที่ควรใช้ใน RAID หรับเซิร์ฟเวอร์ กรุณาติดต่อ Kingston เพื่อพิจารณาไดร์ฟ Kingston SSD ที่เหมาะกับรูปแบบการใช้งานของคุณ
FAQ: KSD-052511-GEN-17
ระบบตรวจสอบตนเอง วิเคราะห์และแจ้งข้อมูล (S.M.A.R.T.) เป็นระบบตรวจสอบการทำงานในตัวของฮาร์ดไดร์ฟและ SSD ช่วยให้ผู้ใช้สามารถตรวจสอบความสมบูรณ์ของอุปกรณ์ได้ ซึ่งทำได้โดยอาศัยซอฟต์แวร์ตรวจสอบการทำงานที่พัฒนาขึ้นมาเฉพาะสำหรับ S.M.A.R.T. ไดร์ฟ SSDNow ทั้งหมดของเรารองรับระบบ S.M.A.R.T.
FAQ: KSD-011411-GEN-10
If your SSD requires new firmware, you will receive a notification when running Kingston’s SSD Manager software, located here: www.kingston.com/ssdmanager
FAQ: KSD-012010-001-11
ระบบตรวจสอบตนเอง วิเคราะห์และแจ้งข้อมูล (S.M.A.R.T.) เป็นระบบตรวจสอบการทำงานในตัวของฮาร์ดไดร์ฟและ SSD ช่วยให้ผู้ใช้สามารถตรวจสอบความสมบูรณ์ของอุปกรณ์ได้ ซึ่งทำได้โดยอาศัยซอฟต์แวร์ตรวจสอบการทำงานที่พัฒนาขึ้นมาเฉพาะสำหรับ S.M.A.R.T. ไดร์ฟ SSDNow ทั้งหมดของเรารองรับระบบ S.M.A.R.T.
FAQ: KSD-011411-GEN-10
Trim และ Garbage Collection คือเทคโนโลยีที่ SSD รุ่นใหม่ใช้เพื่อปรับปรุงประสิทธิภาพและความทนทานในการใช้งาน หากคุณใช้ SSD ใหม่ บล็อค NAND ทั้งหมดจะยังไม่มีข้อมูล ดังนั้น SSD จะสามารถเขียนข้อมูลใหม่ไปยังบล็อคเปล่าได้ในการทำงานหนึ่งครั้ง เมื่อผ่านไปบล็อคข้อมูลเปล่าก็จะถูกใช้งานและเก็บข้อมูลผู้ใช้ไว้ เพื่อเขียนข้อมูลใหม่ลงไปยังบล็อคที่ใช้งานแล้ว SSD จะต้องทำงานเป็นรอบการอ่าน-แก้ไข-เขียนข้อมูล รอบการอ่าน-แก้ไข-เขียนข้อมูลมีผลกระทบต่อ SSD โดยรวมเนื่องจากจะต้องทำงานถึงสามอย่างแทนที่จะเป็นเพียงอย่างเดียว รอบการอ่าน-แก้ไข-เขียนข้อมูลจะทำให้เกิดภาระอย่างมากต่อ SSD และความทนทานของไดร์ฟโดยรวม
Trim และ Garbage Collection จะทำงานประสานกันเพื่อเพิ่มประสิทธิภาพให้แก่ SSD และความทนทานของไดร์ฟโดยการเพิ่มพื้นที่ให้แก่บล็อคข้อมูลที่ถูกใช้งานแล้ว Garbage Collection เป็นฟังก์ชั่นสำเร็จในระบบควบคุม SSD โดยจะรวบรวมข้อมูลที่จัดเก็บไว้ในบล็อคที่ใช้งานแล้วเข้าด้วยกันเพื่อให้มีบล็อคเปล่าสำหรับใช้งาน กระบวนการนี้จะเกิดขึ้นอยู่เบื้องหลังและจัดการโดย SSD เองทั้งหมด
อย่างไรก็ตาม SSD อาจไม่ทราบว่าบล็อคข้อมูลใดที่มีข้อมูลผู้ใช้และบล็อคข้อมูลใดที่มีข้อมูลที่ผู้ใช้ลบทิ้งไปแล้ว นี่เป็นจุดที่การทำงานแบบ Trim เข้ามาดูแล โดย Trim จะช่วยให้ระบบปฏิบัติการสามารถแจ้งกับ SSD ว่าข้อมูลใดที่ถูกลบเพื่อให้ SSD สามารถเพิ่มพื้นที่ให้กับบล็อคข้อมูลที่เคยถูกใช้งานก่อนหน้านี้
ในการทำงานระบบปฏิบัติการและตัว SSD เองจะต้องรองรับฟังก์ชั่นนี้ด้วย ปัจจุบันระบบปฏิบัติการและ SSD รุ่นใหม่ ๆ จะรองรับ Trim แต่โครงร่างการทำงาน RAID ส่วนใหญ่ยังไม่รองรับ
Kingston SSD ใช้ประโยชน์จากเทคโนโลยี Garbage Collection และ Trim เพื่อรักษาประสิทธิภาพและความทนทานตลอดอายุการใช้งานของไดร์ฟ
FAQ: KSD-011411-GEN-13
ElectroStatic Discharge, ESD คือการถ่ายประจำของประจุไฟฟ้าสถิตสะสมทั่วไป ESD เป็นปัญหาที่จะต้องใส่ใจเนื่องจากเป็นสิ่งที่อาจทำความเสียหายหรือทำลายส่วนประกอบของคอมพิวเตอร์หรือฮาร์ดแวร์ได้ เหมือนกับการถูเท้าบนพรมแล้วเตะโลหะเข้า ESD อาจเกิดขึ้นโดยที่ผู้ใช้ไม่จำเป็นต้องรู้สึกว่าถูกช็อต และจะเกิดขึ้นก็ต่อเมื่อมีการดำเนินการใด ๆ ภายในคอมพิวเตอร์หรือชิ้นส่วนฮาร์ดแวร์
วิธีป้องกัน ESD
วิธีที่ดีที่สุดในการป้องกัน ESD คือใช้สายคล้องข้อมือป้องกัน ESD หรือพรมหรือโต๊ะกราวด์ เนื่องจากผู้ใช้ส่วนใหญ่ไม่มีอุปกรณ์เหล่านี้ เราจึงได้จัดทำคำแนะนำต่อไปนี้เพื่อช่วยในการลดปัญหาโอกาสการเกิด ESD ให้มากที่สุด
- การยืน - แนะนำให้ยืนตลอดเวลาระหว่างดำเนินการกับคอมพิวเตอร์ การนั่งบนเก้าอี้มีโอกาสทำให้เกิดไฟฟ้าสถิตได้มากกว่า
- สายต่อ - นำสายต่อต่าง ๆ ออกจากด้านหลังคอมพิวเตอร์ (สายไฟ เมาส์ แป้นพิมพ์ ฯลฯ)
- เสื้อผ้า - อย่าสวมเสื้อผ้าที่นำไฟฟ้ามาก เช่น เสื้อขนสัตว์
- เครื่องประดับ - เพื่อลด ESD และป้องกันปัญหาอื่น ๆ แนะนำให้นำเครื่องประดับออก
- สภาพอากาศ - ฝนฟ้าคะนองจะเพิ่มโอกาสในการเกิด ESD พยายามอย่าดำเนินการใด ๆ กับคอมพิวเตอร์ในช่วงฝนฟ้าคะนอง ยกเว้นไม่สามารถหลีกเลี่ยงได้ แม้ในสภาพอากาศแห้ง อากาศก็อาจทำให้เกิดไฟฟ้าสถิตทุกครั้งที่มีการไหลของกระแสอากาศ (ลม เครื่องปรับอากาศ พัดลม) ที่พัดผ่านพื้นผิวที่มีฉนวน ความชื้นสูงไม่ควรทำให้ประมาท ระมัดระวังปัญหาการสึกกร่อนกับส่วนต่อเชื่อมและหน้าสัมผัสทางไฟฟ้าต่าง ๆ
ดูรายละเอียดเพิ่มเติมเกี่ยวกับ ESD และการปกป้องอุปกรณ์อิเล็กทรอนิกส์ของคุณได้จากไซต์ต่อไปนี้
ESD Association
https://www.esda.org
FAQ: KTC-Gen-ESD
https://www.kingston.com/en/blog/pc-performance/nvme-vs-sata
FAQ: KSD-012010-001-19
FAQ: KSD-012010-001-04
1. เริ่มจากสำรองข้อมูลของคุณไว้ล่วงหน้า
2. จากนั้นใช้เครื่องสำรองเพื่อเรียกใช้ REVERT ผ่าน PSID ที่ฉลากไดรฟ์ หมายเหตุ: ดำเนินขั้นตอน REVERT เพื่อลบข้อมูลทั้งหมดในไดรฟ์อย่างปลอดภัย
3. ปิดใช้งาน IEEE 1667
4. การอัพเดตเฟิร์มแวร์จะสามารถทำได้เมื่อทำการรีเฟรชหรือรีสตาร์ท KSM
FAQ: KSM-001125-001-01
A. เครื่องของคุณอาจมีการโหลดไดรเวอร์ Intel RST แทนที่จะเป็น Microsoft NVMe ขณะนี้มีปัญหาด้านการรองรับการทำงานกับไดรเวอร์ Intel RST ที่กระทบกับคำสั่งอัปเดตเฟิร์มแวร์ของ NVMe นอกจากนี้ KSM อาจจะรองรับเฉพาะระบบที่ใช้ Windows เท่านั้น ดังนั้น หากคุณพยายามเปิด KSM บนระบบ macOS หรือ Linux ระบบปฏิบัติการเหล่านี้จะใช้ร่วมกับ KSM ไม่ได้
FAQ: KSM-001125-002-01
FAQ: KSM-001125-001-00
If your SSD requires new firmware, you will receive a notification when running Kingston’s SSD Manager software, located here: www.kingston.com/ssdmanager
FAQ: KSD-012010-001-11
FAQ: KSD-012010-001-12
FAQ: KSD-012010-001-13
FAQ: KSD-012010-001-14
FAQ: KSD-012010-001-04
If the drive is present in the BIOS, you may need to initialize the disk within the operating system. Follow the steps below to initialize.
For Windows:
Step 1: Confirm the drive is properly attached, and power on the system, then boot into Windows OS.
Step 2: Press Windows + X and choose Disk Management.
Step 3: If the SSD is new and not initialized, a popup will appear saying "Initialize Disk."
Step 4: Choose between: MBR (Master Boot Record): Suitable for drives under 2TB and older systems. GPT (GUID Partition Table): Recommended for modern systems and drives larger than 2TB.
Step 5: Click OK to initialize the disk.
Step 6: Once initialized, you'll see the SSD as "Unallocated." Right-click on it and select New Simple Volume.
Step 7: Follow the on-screen prompts (keeping all defaults is Okay) to format and assign a drive letter to the SSD.
For macOS:
Step 1: Confirm the drive is properly attached, and power on the system, then boot into Mac OS.
Step 2: Open Disk Utility (you can find it using Spotlight with Cmd + Space and then typing "Disk Utility").
Step 3: In the left pane, select your SSD.
Step 4: Click on Erase.
Step 5: Provide a name for the drive, and under Format, choose: APFS for newer Macs and SSDs. Mac OS Extended (Journaled) for older systems or HDDs.
Step 6: Click Erase. Once the process completes, the SSD will be ready for use.
For Linux:
Step 1: Confirm the drive is properly attached, and power on the system, then boot into Linux OS.
Step 2: Open a terminal.
Step 3: Enter sudo fdisk -l to list all connected drives. Identify your SSD by its size and note the device name, e.g., /dev/sdb.
Step 4: Initialize the SSD using fdisk or parted. Here's a basic guide using fdisk: Enter sudo fdisk /dev/sdb (replace /dev/sdb with your SSD's device name). Press g to create a new GPT partition table. Press n to create a new partition. Follow the prompts to specify the size and type. Press w to write the changes.
Step 5: Format the new partition on the SSD (e.g., /dev/sdb1). You can format it with the filesystem of your choice: For ext4: sudo mkfs.ext4, For ext3: sudo mkfs.ext3 /dev/sdb1 /dev/sdb1, For FAT32: sudo mkfs.vfat /dev/sdb1
Step 6: Mount the SSD: Create a mount point: sudo mkdir /mnt/myssd, Mount the SSD: sudo mount /dev/sdb1 /mnt/myssd, Remember to replace /dev/sdb1 with your SSD's partition name.
FAQ: KSD-012010-001-15
FAQ: KSD-012010-001-18
FAQ: KSD-012010-001-04
If your SSD requires new firmware, you will receive a notification when running Kingston’s SSD Manager software, located here: www.kingston.com/ssdmanager
FAQ: KSD-012010-001-11
FAQ: KSD-012010-001-13
FAQ: KSD-012010-001-12
If this is not possible, or if you previously cloned your old data to your new drive, confirm that the new drive appears as a boot device in the system BIOS, then select it for booting.
FAQ: KSD-012010-001-03
https://www.kingston.com/blog/pc-performance/install-2-5-inch-ssd
Desktop Computer (Video):
https://www.kingston.com/video/play?videoId=RmjwKbJ4biUkKkAAmG7VOatemUJdnwTKGEqj9s2vbovKGfsg18iNhiM-UfxwN2aJ0Ltg9YicryR-pSSa4GLPmA2&start=0&autoPlay=True&chromeless=False&texttrack=en-US
FAQ: KSD-012010-001-02
FAQ: KSD-012010-001-18
If the drive is present in the BIOS, you may need to initialize the disk within the operating system. Follow the steps below to initialize.
For Windows:
Step 1: Confirm the drive is properly attached, and power on the system, then boot into Windows OS.
Step 2: Press Windows + X and choose Disk Management.
Step 3: If the SSD is new and not initialized, a popup will appear saying "Initialize Disk."
Step 4: Choose between: MBR (Master Boot Record): Suitable for drives under 2TB and older systems. GPT (GUID Partition Table): Recommended for modern systems and drives larger than 2TB.
Step 5: Click OK to initialize the disk.
Step 6: Once initialized, you'll see the SSD as "Unallocated." Right-click on it and select New Simple Volume.
Step 7: Follow the on-screen prompts (keeping all defaults is Okay) to format and assign a drive letter to the SSD.
For macOS:
Step 1: Confirm the drive is properly attached, and power on the system, then boot into Mac OS.
Step 2: Open Disk Utility (you can find it using Spotlight with Cmd + Space and then typing "Disk Utility").
Step 3: In the left pane, select your SSD.
Step 4: Click on Erase.
Step 5: Provide a name for the drive, and under Format, choose: APFS for newer Macs and SSDs. Mac OS Extended (Journaled) for older systems or HDDs.
Step 6: Click Erase. Once the process completes, the SSD will be ready for use.
For Linux:
Step 1: Confirm the drive is properly attached, and power on the system, then boot into Linux OS.
Step 2: Open a terminal.
Step 3: Enter sudo fdisk -l to list all connected drives. Identify your SSD by its size and note the device name, e.g., /dev/sdb.
Step 4: Initialize the SSD using fdisk or parted. Here's a basic guide using fdisk: Enter sudo fdisk /dev/sdb (replace /dev/sdb with your SSD's device name). Press g to create a new GPT partition table. Press n to create a new partition. Follow the prompts to specify the size and type. Press w to write the changes.
Step 5: Format the new partition on the SSD (e.g., /dev/sdb1). You can format it with the filesystem of your choice: For ext4: sudo mkfs.ext4, For ext3: sudo mkfs.ext3 /dev/sdb1 /dev/sdb1, For FAT32: sudo mkfs.vfat /dev/sdb1
Step 6: Mount the SSD: Create a mount point: sudo mkdir /mnt/myssd, Mount the SSD: sudo mount /dev/sdb1 /mnt/myssd, Remember to replace /dev/sdb1 with your SSD's partition name.
FAQ: KSD-012010-001-15
FAQ: KSD-012010-001-14