
IronKey Vault Privacy 80 Encrypted External SSD -지원
리소스
동영상


FAQ(자주 묻는 질문)
이는 내부 SSD든 외부 USB 스토리지든 플래시 스토리지에 공통적으로 나타나는 현상이며, 부분적으로는 플래시 메모리와 회전형 플래터 하드 드라이브 제조업체가 메가바이트를 계산하는 방식이 다르기 때문이기도 합니다. 하드 드라이브 제조업체는 메가바이트(또는 1,000x1,000바이트)를 1,000KB로 계산하는 반면, 플래시 기반 스토리지의 이진 계산은 1,024KB입니다.
예: 1TB 플래시 기반 저장 장치의 경우, Windows는 이 장치의 용량을 931.32GB로 계산합니다. (1,000,000,000,000÷1,024÷1,024÷1,024=931.32GB).
또한, Kingston은 펌웨어 및/또는 컨트롤러별 정보와 같은 포맷 및 기타 기능을 위해 나열된 용량 중 일부를 예약하고 있으므로 나열된 용량 중 일부는 데이터 저장에 사용할 수 없습니다.
FAQ: KDT-010611-GEN-06
이것이 불가능하거나 이전에 기존 데이터를 새 드라이브에 복제한 경우에는 시스템 BIOS에서 새 드라이브가 부팅 장치로 표시되는지 확인한 다음 부팅용으로 선택합니다.
FAQ: KSD-012010-001-03
FAQ: KSD-012010-001-18
드라이브가 존재하지 않는다면 시스템의 전원을 끄고 설치 및 연결 상태를 확인하여 드라이브가 제대로 장착 및/또는 연결되었는지 확인하십시오.
드라이브가 BIOS에 있는 경우 운영 체제 내에서 디스크를 초기화해야 할 수도 있습니다.
Windows의 경우:
1단계: 드라이브가 제대로 연결되었는지 확인하고 시스템의 전원을 켠 다음 Windows OS로 부팅합니다.
2단계: Windows + X를 누르고 디스크 관리를 선택합니다.
3단계: SSD가 새 것이고 초기화되지 않은 경우 "디스크 초기화"라는 팝업이 나타납니다.
4단계: 다음 중에서 선택합니다:
MBR(마스터 부트 레코드): 2TB 미만의 드라이브 및 구형 시스템에 적합합니다.
GPT(GUID 파티션 테이블): 최신 시스템 및 2TB 이상의 드라이브에 권장됩니다.
5단계: 확인을 클릭하여 디스크를 초기화합니다.
6단계: 초기화를 마치면 SSD가 "할당되지 않음"으로 표시됩니다. 마우스 오른쪽 버튼으로 클릭하고 새 단순 볼륨을 선택합니다.
7단계: 화면의 지시에 따라 SSD를 포맷하고 드라이브 문자를 할당합니다.
Mac OS의 경우:
1단계: 드라이브가 제대로 연결되었는지 확인하고 시스템의 전원을 켠 다음 Mac OS로 부팅합니다.
2단계: Disk Utility(디스크 유틸리티)를 엽니다(Spotlight에서 Cmd + 스페이스키를 누른 다음 "Disk Utility(디스크 유틸리티)"를 입력하면 찾을 수 있습니다).
3단계: 왼쪽 창에서 SSD를 선택합니다.
4단계: Erase(지우기)를 클릭합니다.
5단계: 드라이브의 이름을 입력하고 포맷 아래에서 다음을 선택합니다:
최신 Mac 및 SSD의 경우 APFS를 선택합니다.
구형 시스템 또는 HDD의 경우 Mac OS Extended(Journaled)(Mac OS 확장형(저널링))를 선택합니다.
6단계: Erase(지우기)를 클릭합니다. 프로세스가 완료되면 SSD를 사용할 준비가 된 것입니다.
Linux의 경우:
1단계: 드라이브가 제대로 연결되었는지 확인하고 시스템의 전원을 켠 다음 Linux OS로 부팅합니다.
2단계: 터미널을 엽니다.
3단계: sudo fdisk -l을 입력해 연결된 모든 드라이브를 나열합니다. 크기별로 SSD를 식별하고 장치 이름(예: /dev/sdb)을 기록합니다.
4단계: fdisk 또는 parted 명령어를 사용하여 SSD를 초기화합니다. 다음은 fdisk를 사용하는 기본 가이드입니다:
sudo fdisk /dev/sdb를 입력합니다(/dev/sdb를 귀하의 SSD의 장치 이름으로 바꿉니다).
g를 눌러 새 GPT 파티션 테이블을 생성합니다.
새 파티션을 생성하려면 n을 누릅니다. 메시지 프롬프트에 따라 크기와 유형을 지정합니다.
w를 눌러 변경 내용을 기록합니다.
5단계: SSD에서 새 파티션을 포맷합니다(예: /dev/sdb1). 원하는 파일 시스템으로 포맷할 수 있습니다:
ext4의 경우: sudo mkfs.ext4 /dev/sdb1
ext3의 경우: sudo mkfs.ext3 /dev/sdb1
FAT32의 경우: sudo mkfs.vfat /dev/sdb1
6단계: SSD를 마운트합니다:
마운트 지점 생성: sudo mkdir /mnt/myssd
SSD 마운트: sudo mount /dev/sdb1 /mnt/myssd
dev/sdb1을 귀하의 SSD의 파티션 이름으로 바꾸는 것을 잊지 마십시오.
FAQ: KSD-012010-001-15
SSD에 새 펌웨어가 필요한 경우, Kingston의 SSD Manager 소프트웨어를 실행하면 알림을 받게 되며, 여기에서 확인하실 수 있습니다: www.kingston.com/ssdmanager
FAQ: KSD-012010-001-11
https://www.kingston.com/blog/pc-performance/nvme-vs-sata
FAQ: KSD-012010-001-19
FAQ: KSD-012010-001-04
SSD에 새 펌웨어가 필요한 경우, Kingston의 SSD Manager 소프트웨어를 실행하면 알림을 받게 되며, 여기에서 확인하실 수 있습니다: www.kingston.com/ssdmanager
FAQ: KSD-012010-001-11
FAQ: KSD-012010-001-12
FAQ: KSD-012010-001-13
FAQ: KSD-012010-001-14
FAQ: KSD-012010-001-04
Disabling Windows 10/11 Power Save
NOTE: You will need to complete the following steps once for each drive plugged into your computer.
1. Log in as a local administrator on your computer.
NOTE: If you are not an administrator on Windows, you will receive a warning indicating you won’t be able to make changes when you open Device Manager. Please contact your
administrator for further assistance if required.
2. Unlock your VP80ES drive.
3. Right click the Start button and select “Device Manager”.
4. Click on the arrow next to “Universal Serial Bus controllers”.
5. Right click on “USB Mass Storage Drive”.
6. Click “Properties”.
7. Click the “Power Management” tab.
8. Uncheck “Allow the computer to turn off this drive to save power”.
9. Click OK and close the “Device Manager” window.
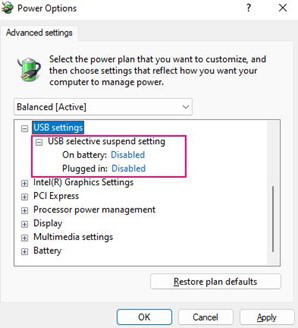
Disabling Windows 10/11 Selective Suspend
1. In the search box on the taskbar, type control panel.
2. Click and Open Control Panel.
3. Click on Hardware and Sound.
4. Click on Power Options.
5. Click the Change plan settings link for the plan you’re currently using.
6. Click the Change advanced power settings link.
7. Click (+) next to “USB settings”.
8. Click (+) next to “USB selective suspend setting”.
9. Select “Disabled” from the drop-down menu.
NOTE: If you are using a device with a battery (i.e., laptop or tablet), you will need to set this for On Battery and Plugged in.
10. Click Apply to save settings and click OK.
You’re All Set!
If the steps above resolved your problem, you’re all set!
If you still experience lock-ups, proceed to the trouble-shooting tips below.
(Trouble-shooting Tips)
I’ve completed the steps above, but my VP80ES continues to lock after short periods of inactivity. What else can I do?
If you have a high capacity IronKey VP80ES (e.g., 2TB and above), you may also need to disable the Hard Disk power save option to prevent the drive from locking unexpectedly. See steps 1-10 below.
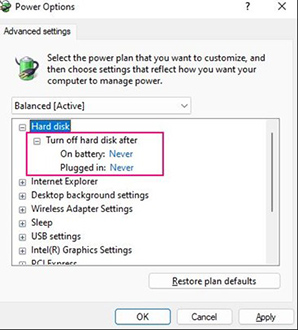
Disabling Windows 10/11 Turn off hard disk power save
1. In the search box on the taskbar, type control panel.
2. Click and Open Control Panel.
3. Click on Hardware and Sound.
4. Click on Power Options.
5. Click the Change plan settings link for the plan you’re currently using.
6. Click the Change advanced power settings link.
7. Click (+) next to “Hard Disk”
8. Click (+) next to “Turn off hard disk after”
9. Click the down button Set both “On Battery” and “Plugged in” options to “Never”
10. Click Apply to save settings and click OK.
FAQ: KSD-002202-011.01
드라이브가 존재하지 않는다면 시스템의 전원을 끄고 설치 및 연결 상태를 확인하여 드라이브가 제대로 장착 및/또는 연결되었는지 확인하십시오.
드라이브가 BIOS에 있는 경우 운영 체제 내에서 디스크를 초기화해야 할 수도 있습니다.
Windows의 경우:
1단계: 드라이브가 제대로 연결되었는지 확인하고 시스템의 전원을 켠 다음 Windows OS로 부팅합니다.
2단계: Windows + X를 누르고 디스크 관리를 선택합니다.
3단계: SSD가 새 것이고 초기화되지 않은 경우 "디스크 초기화"라는 팝업이 나타납니다.
4단계: 다음 중에서 선택합니다:
MBR(마스터 부트 레코드): 2TB 미만의 드라이브 및 구형 시스템에 적합합니다.
GPT(GUID 파티션 테이블): 최신 시스템 및 2TB 이상의 드라이브에 권장됩니다.
5단계: 확인을 클릭하여 디스크를 초기화합니다.
6단계: 초기화를 마치면 SSD가 "할당되지 않음"으로 표시됩니다. 마우스 오른쪽 버튼으로 클릭하고 새 단순 볼륨을 선택합니다.
7단계: 화면의 지시에 따라 SSD를 포맷하고 드라이브 문자를 할당합니다.
Mac OS의 경우:
1단계: 드라이브가 제대로 연결되었는지 확인하고 시스템의 전원을 켠 다음 Mac OS로 부팅합니다.
2단계: Disk Utility(디스크 유틸리티)를 엽니다(Spotlight에서 Cmd + 스페이스키를 누른 다음 "Disk Utility(디스크 유틸리티)"를 입력하면 찾을 수 있습니다).
3단계: 왼쪽 창에서 SSD를 선택합니다.
4단계: Erase(지우기)를 클릭합니다.
5단계: 드라이브의 이름을 입력하고 포맷 아래에서 다음을 선택합니다:
최신 Mac 및 SSD의 경우 APFS를 선택합니다.
구형 시스템 또는 HDD의 경우 Mac OS Extended(Journaled)(Mac OS 확장형(저널링))를 선택합니다.
6단계: Erase(지우기)를 클릭합니다. 프로세스가 완료되면 SSD를 사용할 준비가 된 것입니다.
Linux의 경우:
1단계: 드라이브가 제대로 연결되었는지 확인하고 시스템의 전원을 켠 다음 Linux OS로 부팅합니다.
2단계: 터미널을 엽니다.
3단계: sudo fdisk -l을 입력해 연결된 모든 드라이브를 나열합니다. 크기별로 SSD를 식별하고 장치 이름(예: /dev/sdb)을 기록합니다.
4단계: fdisk 또는 parted 명령어를 사용하여 SSD를 초기화합니다. 다음은 fdisk를 사용하는 기본 가이드입니다:
sudo fdisk /dev/sdb를 입력합니다(/dev/sdb를 귀하의 SSD의 장치 이름으로 바꿉니다).
g를 눌러 새 GPT 파티션 테이블을 생성합니다.
새 파티션을 생성하려면 n을 누릅니다. 메시지 프롬프트에 따라 크기와 유형을 지정합니다.
w를 눌러 변경 내용을 기록합니다.
5단계: SSD에서 새 파티션을 포맷합니다(예: /dev/sdb1). 원하는 파일 시스템으로 포맷할 수 있습니다:
ext4의 경우: sudo mkfs.ext4 /dev/sdb1
ext3의 경우: sudo mkfs.ext3 /dev/sdb1
FAT32의 경우: sudo mkfs.vfat /dev/sdb1
6단계: SSD를 마운트합니다:
마운트 지점 생성: sudo mkdir /mnt/myssd
SSD 마운트: sudo mount /dev/sdb1 /mnt/myssd
dev/sdb1을 귀하의 SSD의 파티션 이름으로 바꾸는 것을 잊지 마십시오.
FAQ: KSD-012010-001-15
FAQ: KSD-012010-001-18
FAQ: KSD-012010-001-04
이것이 불가능하거나 이전에 기존 데이터를 새 드라이브에 복제한 경우에는 시스템 BIOS에서 새 드라이브가 부팅 장치로 표시되는지 확인한 다음 부팅용으로 선택합니다.
FAQ: KSD-012010-001-03
FAQ: KSD-012010-001-14
FAQ: KSD-012010-001-13
FAQ: KSD-012010-001-12
SSD에 새 펌웨어가 필요한 경우, Kingston의 SSD Manager 소프트웨어를 실행하면 알림을 받게 되며, 여기에서 확인하실 수 있습니다: www.kingston.com/ssdmanager
FAQ: KSD-012010-001-11
FAQ: KSD-012010-001-18
드라이브가 존재하지 않는다면 시스템의 전원을 끄고 설치 및 연결 상태를 확인하여 드라이브가 제대로 장착 및/또는 연결되었는지 확인하십시오.
드라이브가 BIOS에 있는 경우 운영 체제 내에서 디스크를 초기화해야 할 수도 있습니다.
Windows의 경우:
1단계: 드라이브가 제대로 연결되었는지 확인하고 시스템의 전원을 켠 다음 Windows OS로 부팅합니다.
2단계: Windows + X를 누르고 디스크 관리를 선택합니다.
3단계: SSD가 새 것이고 초기화되지 않은 경우 "디스크 초기화"라는 팝업이 나타납니다.
4단계: 다음 중에서 선택합니다:
MBR(마스터 부트 레코드): 2TB 미만의 드라이브 및 구형 시스템에 적합합니다.
GPT(GUID 파티션 테이블): 최신 시스템 및 2TB 이상의 드라이브에 권장됩니다.
5단계: 확인을 클릭하여 디스크를 초기화합니다.
6단계: 초기화를 마치면 SSD가 "할당되지 않음"으로 표시됩니다. 마우스 오른쪽 버튼으로 클릭하고 새 단순 볼륨을 선택합니다.
7단계: 화면의 지시에 따라 SSD를 포맷하고 드라이브 문자를 할당합니다.
Mac OS의 경우:
1단계: 드라이브가 제대로 연결되었는지 확인하고 시스템의 전원을 켠 다음 Mac OS로 부팅합니다.
2단계: Disk Utility(디스크 유틸리티)를 엽니다(Spotlight에서 Cmd + 스페이스키를 누른 다음 "Disk Utility(디스크 유틸리티)"를 입력하면 찾을 수 있습니다).
3단계: 왼쪽 창에서 SSD를 선택합니다.
4단계: Erase(지우기)를 클릭합니다.
5단계: 드라이브의 이름을 입력하고 포맷 아래에서 다음을 선택합니다:
최신 Mac 및 SSD의 경우 APFS를 선택합니다.
구형 시스템 또는 HDD의 경우 Mac OS Extended(Journaled)(Mac OS 확장형(저널링))를 선택합니다.
6단계: Erase(지우기)를 클릭합니다. 프로세스가 완료되면 SSD를 사용할 준비가 된 것입니다.
Linux의 경우:
1단계: 드라이브가 제대로 연결되었는지 확인하고 시스템의 전원을 켠 다음 Linux OS로 부팅합니다.
2단계: 터미널을 엽니다.
3단계: sudo fdisk -l을 입력해 연결된 모든 드라이브를 나열합니다. 크기별로 SSD를 식별하고 장치 이름(예: /dev/sdb)을 기록합니다.
4단계: fdisk 또는 parted 명령어를 사용하여 SSD를 초기화합니다. 다음은 fdisk를 사용하는 기본 가이드입니다:
sudo fdisk /dev/sdb를 입력합니다(/dev/sdb를 귀하의 SSD의 장치 이름으로 바꿉니다).
g를 눌러 새 GPT 파티션 테이블을 생성합니다.
새 파티션을 생성하려면 n을 누릅니다. 메시지 프롬프트에 따라 크기와 유형을 지정합니다.
w를 눌러 변경 내용을 기록합니다.
5단계: SSD에서 새 파티션을 포맷합니다(예: /dev/sdb1). 원하는 파일 시스템으로 포맷할 수 있습니다:
ext4의 경우: sudo mkfs.ext4 /dev/sdb1
ext3의 경우: sudo mkfs.ext3 /dev/sdb1
FAT32의 경우: sudo mkfs.vfat /dev/sdb1
6단계: SSD를 마운트합니다:
마운트 지점 생성: sudo mkdir /mnt/myssd
SSD 마운트: sudo mount /dev/sdb1 /mnt/myssd
dev/sdb1을 귀하의 SSD의 파티션 이름으로 바꾸는 것을 잊지 마십시오.
FAQ: KSD-012010-001-15