
A2000 NVMe PCIe SSD - การสนับสนุน
ข้อมูลอ้างอิง
วิดีโอ


คำถามที่พบบ่อย
1. ดาวน์โหลด Kingston SSD Manager จากเว็บไซต์ https://www.kingston.com/support/technical/ssdmanager เพื่อดูว่าไดรฟ์ต้องอัปเดตเฟิร์มแวร์หรือไม่ ถ้าใช่ อัปเดตให้เสร็จเรียบร้อย (ถ้าระบบแนะนำ)
2. อ่านหน้าการสนับสนุนของผู้ผลิตอุปกรณ์ของคุณ แล้วตรวจสอบว่าอุปกรณ์ต้องอัปเดต BIOS หรือไม่
3. ตรวจสอบยืนยันว่าคุณกำลังใช้ระบบปฏิบัติการเวอร์ชันล่าสุดอยู่หรือไม่ และตรวจสอบให้แน่ใจว่าไม่มีการอัปเดตที่อยู่ระหว่างดำเนินการ
4. ตรวจสอบยืนยันว่าคุณกำลังใช้งานไดรเวอร์เวอร์ชันล่าสุดของอุปกรณ์ โดยการเข้าไปที่หน้าการสนับสนุนของผู้ผลิตอุปกรณ์ จากนั้นมองหาการอัปเดตไดรเวอร์ล่าสุด
หากคุณยังเจอปัญหาหลังจากทำตามขั้นตอนเหล่านี้ โปรดติดต่อฝ่ายสนับสนุนทางเทคนิคของ Kingston
FAQ: KSD-012010-001-21
นี่เป็นเรื่องปกติสำหรับอุปกรณ์จัดเก็บข้อมูลแบบแฟลช ทั้งในกรณีของ SSD แบบภายในและไดรฟ์ USB แบบต่อพ่วง ส่วนหนึ่งเป็นเพราะผู้ผลิตหน่วยความจำแฟลชและผู้ผลิตฮาร์ดไดรฟ์แบบจานหมุนมีวิธีคำนวณเมกะไบต์ที่แตกต่างกัน ผู้ผลิตฮาร์ดไดรฟ์คำนวณเมกะไบต์ (หรือ 1,000x1,000 ไบต์) เป็น 1,000KB ส่วนอุปกรณ์จัดเก็บข้อมูลแบบแฟลชคำนวณแบบไบนารีหรือก็คือ 1,024KB
ตัวอย่าง: สำหรับอุปกรณ์จัดเก็บข้อมูลแบบแฟลช 1TB Windows จะคำนวณความจุเท่ากับ 931.32GB (1,000,000,000,000÷1,024÷1,024÷1,024=931.32GB)
นอกจากนี้ Kingston ยังกันพื้นที่หน่วยความจำบางส่วนไว้ใช้ในการฟอร์แมตและวัตถุประสงค์อย่างอื่น เช่น เฟิร์มแวร์และ/หรือข้อมูลเกี่ยวกับตัวควบคุม ดังนั้นพื้นที่ส่วนนี้จึงไม่สามารถใช้จัดเก็บข้อมูลได้
FAQ: KDT-010611-GEN-06
หมายเหตุ: ฟังก์ชั่นการลดการทำงานเพื่อลดอุณหภูมิจะทำงานเมื่ออุณหภูมิจากระบบ SMART ขึ้นถึง 80°C
FAQ: KSD-060117-NVME-02
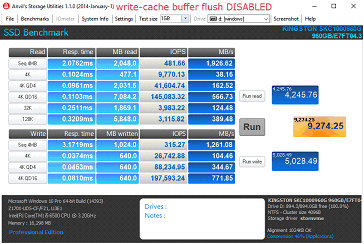
ขั้นตอนในการปิดระบบล้างบัฟเฟอร์แคชการเขียนข้อมูล
1. เปิด Device Manager
2. เลือก Disk Drives ขยายรายการ จากนั้นเลือกไดร์ฟเป้าหมาย
3. คลิกขวาแล้วเลือก Properties
4. เลือก “Turn off Windows write-cache buffer flushing on the device”
a. หมายเหตุ: การปิดระบบล้างบัฟเฟอร์แคชการเขียนข้อมูลที่อุปกรณ์อาจทำให้ข้อมูลสูญหายระหว่างนำส่งและ/หรือความเสียหายของข้อมูลในกรณีที่ไฟดับ ปิดระบบนี้เฉพาะในกรณีที่คุณเข้าใจเกี่ยวกับความเสี่ยงที่อาจเกิดขึ้นเท่านั้น
เปรียบเทียบประสิทธิภาพในการทำงาน

FAQ: KSD-060117-KC1000-04
FAQ: KSD-060117-NVME-01
FAQ: KSD-001525-001-00
โปรดดูคู่มือของเรา: การติดตั้ง M.2 SSD
โปรดทราบว่าคุณอาจต้องการโคลนไดรฟ์ที่คุณกำลังเปลี่ยน ดูคู่มือของเราในการโคลนไดรฟ์ด้วยซอฟต์แวร์ Acronis ที่มาพร้อมกัน
FAQ: KSD-012010-001-00
โปรดดูคู่มือของเรา:
- วิธีติดตั้ง SSD ภายในขนาด 2.5" นิ้ว
- โปรดทราบว่าคุณอาจต้องการโคลนไดรฟ์ที่คุณกำลังเปลี่ยน โปรดดูคู่มือของเราในการโคลนไดรฟ์ของคุณด้วยซอฟต์แวร์ Acronis ที่มาพร้อมกัน
FAQ: KSD-012010-001-01
แต่หากทำแบบนั้นไม่ได้หรือหากคุณเคยโคลนข้อมูลเก่าไปยังไดรฟ์นั้นมาก่อน ยืนยันว่าไดรฟ์ใหม่ปรากฏเป็นอุปกรณ์บู๊ตใน BIOS ของระบบ จากนั้นเลือกไดรฟ์นั้นระหว่างการบู๊ตเครื่อง
FAQ: KSD-012010-001-03
กล่องดิสก์แบบต่อพ่วงมีอยู่มากมายในท้องตลาด ถึงแม้ว่า Kingston จะต้องการให้ผลิตภัณฑ์ใช้งานกับระบบทุกประเภท แต่บางครั้งผลิตภัณฑ์ของเราก็ใช้งานกับบางระบบไม่ได้
หากคุณประสบปัญหากับอุปกรณ์เชื่อมต่อ SSD ที่ไม่ใช่ของ Kingston โปรดติดต่อการรองรับทางเทคนิคของ Kingston เพื่อขอความช่วยเหลือในการแก้ไขปัญหา
FAQ: KSD-012010-001-18
โปรดดูคู่มือของเราเกี่ยวกับเทคโนโลยี SSD แบบ M.2
FAQ: KSD-012010-001-16
-ยืนยันว่า BIOS ของระบบรู้จัก SSD ตัวใหม่ แต่ถ้าไม่รู้จัก เข้าไปที่เว็บไซต์ของผู้ผลิตเมนบอร์ด / ระบบ เพื่อดูว่ามี BIOS ใหม่ล่าสุดหรือไม่
-ตรวจสอบว่า BIOS ได้รับการกำหนดค่าให้ยอมรับ NVMe SSD ตัวใหม่
-ยืนยันว่าระบบปฏิบัติการที่จะติดตั้งนั้นยอมรับ NVMe SSD (เช่น Windows 8 หรือใหม่กว่า)
หมายเหตุ: Kingston SSD ไม่ต้องใช้ไดรเวอร์เพิ่มเติมในการทำงาน
FAQ: KSD-012010-001-05
ปกติแล้ว Windows 7 ไม่รองรับ NVMe SSD โปรดดูคำอธิบายการแก้ไขของ Microsoft สำหรับการติดตั้ง Windows 7 บน NVMe SSD ของคุณ
FAQ: KSD-012010-001-06
FAQ: KSD-012010-001-07
หากเจอไดรฟ์ใน BIOS คุณอาจจะต้องเริ่มการทำงานของไดรฟ์ภายในระบบปฏิบัติการ
สำหรับ Windows:
ขั้นตอนที่ 1: ยืนยันว่าเชื่อมต่อไดรฟ์ถูกต้องแล้ว จากนั้นเปิดเครื่องและบู๊ตเครื่องเข้าสู่ Windows OS
ขั้นตอนที่ 2: กดปุ่ม Windows + X แล้วเลือก Disk Management
ขั้นตอนที่ 3: หากเป็น SSD ใหม่ที่ยังไม่ได้เริ่มใช้งาน หน้าต่างป๊อปอัปจะปรากฏขึ้นมา พร้อมข้อความ "Initialize Disk"
ขั้นตอนที่ 4: เลือกระหว่าง
MBR (Master Boot Record): เหมาะกับไดรฟ์ที่มีความจุไม่ถึง 2TB และอุปกรณ์แบบเก่า
GPT (GUID Partition Table): แนะนำสำหรับอุปกรณ์สมัยใหม่และไดรฟ์ที่มีความจุมากกว่า 2TB
ขั้นตอนที่ 5: คลิก “OK” เพื่อเริ่มการทำงานของดิสก์
ขั้นตอนที่ 6: หลังจากเริ่มการทำงาน คุณจะเห็นว่า SSD ของคุณเป็น "Unallocated” ให้คลิกขวา แล้วเลือก New Simple Volume
ขั้นตอนที่ 7: ทำตามคำแนะนำบนหน้าจอเพื่อฟอร์แม็ตและกำหนดตัวอักษรระบุไดรฟ์ให้กับ SSD
สำหรับ Mac OS:
ขั้นตอนที่ 1: ยืนยันว่าเชื่อมต่อไดรฟ์ถูกต้องแล้ว จากนั้นเปิดเครื่องและบู๊ตเครื่องเข้าสู่ Mac OS
ขั้นตอนที่ 2: เปิด Disk Utility (โดยใช้ Spotlight ร่วมกับปุ่ม Cmd + Space จากนั้นพิมพ์ "Disk Utility")
ขั้นตอนที่ 3: เลือก SSD ของคุณจากแผงทางซ้ายมือ
ขั้นตอนที่ 4: คลิก Erase
ขั้นตอนที่ 5: ตั้งชื่อไดรฟ์ จากนั้นเลือกตัวเลือกต่อไปนี้ใต้ Format
APFS หากเป็น Mac รุ่นเก่าและ SSD
Mac OS Extended (Journaled) หากเป็นอุปกรณ์รุ่นเก่าหรือ HDD
ขั้นตอนที่ 6: คลิก Erase หลังจากนั้น SSD ก็จะพร้อมใช้งาน
สำหรับ Linux:
ขั้นตอนที่ 1: ยืนยันว่าเชื่อมต่อไดรฟ์ถูกต้องแล้ว จากนั้นเปิดเครื่องและบู๊ตเครื่องเข้าสู่ Linux
ขั้นตอนที่ 2: เปิดเทอร์มินัล
ขั้นตอนที่ 3: ป้อนคำสั่ง sudo fdisk -l เพื่อแสดงไดรฟ์ทั้งหมดที่เชื่อมต่ออยู่ มองหา SSD ของคุณจากขนาดของไดรฟ์ แล้วจดชื่อของไดรฟ์ไว้ เช่น /dev/sdb
ขั้นตอนที่ 4: เริ่มการทำงานของไดรฟ์โดยใช้คำสั่ง fdisk หรือ parted ต่อไปนี้คือคำแนะนำเบื้องต้นในการใช้คำสั่ง fdisk:
ป้อน sudo fdisk /dev/sdb (แทนที่ /dev/sdb ด้วยชื่อไดรฟ์ SSD ของคุณ)
กด g เพื่อสร้างตารางพาร์ติชัน GPT ใหม่
กด n เพื่อสร้างตารางพาร์ติชันใหม่ ทำตามคำแนะนำบนหน้าจอเพื่อระบุขนาดและประเภทไดรฟ์
กด w เพื่อเขียนการเปลี่ยนแปลง
ขั้นตอนที่ 5: กำหนดรูปแบบพาร์ติชันใหม่บน SSD (เช่น /dev/sdb1) คุณสามารถกำหนดรูปแบบเป็นระบบไฟล์ที่ต้องการดังต่อไปนี้:
สำหรับ ext4: sudo mkfs.ext4 /dev/sdb1
สำหรับ ext3: sudo mkfs.ext3 /dev/sdb1
สำหรับ FAT32: sudo mkfs.vfat /dev/sdb1
ขั้นตอนที่ 6: ติดตั้งใช้งาน SSD:
สร้างจุดติดตั้งใช้งาน: sudo mkdir /mnt/myssd
ติดตั้งใช้งาน SSD: sudo mount /dev/sdb1 /mnt/myssd
อย่าลืมแทนที่ /dev/sdb1 ด้วยชื่อพาร์ติชันของ SSD
FAQ: KSD-012010-001-15
ไม่มี Kingston ไม่มีชุดอัปเกรด NVMe
FAQ: KSD-012010-001-30
คู่มือผู้ใช้งานสำหรับ Secure Erase ระบบ Linux
คู่มือชุดนี้แนะนำขั้นตอนในการลบข้อมูลจาก Kingston SSD ของคุณอย่างปลอดภัยผ่านชุดเครื่องมือสำหรับ Linux
กระบวนการลบข้อมูล SATA อย่างปลอดภัย
คำเตือน
อย่าลืมสำรองข้อมูลสำคัญ ๆ ก่อนดำเนินขั้นตอนนี้!
เงื่อนไขเบื้องต้น
- คุณจะต้องมีสิทธิ์สั่งการระดับราก
- คุณจะต้องเชื่อมต่อ SSD กับเครื่องเป็นไดรฟ์สำรอง (non-OS)
- ติดตั้ง lsscsi และ hdparm ไว้ คุณอาจต้องทำการติดตั้งโดยใช้ตัวจัดการแพ็กเกจที่จัดมาให้กับอุปกรณ์
- ไดรฟ์จะต้องไม่ถูกล็อคไว้เพื่อความปลอดภัย
- ไดรฟ์จะต้องไม่มีการป้องกันรหัสผ่านไว้
คำแนะนำ
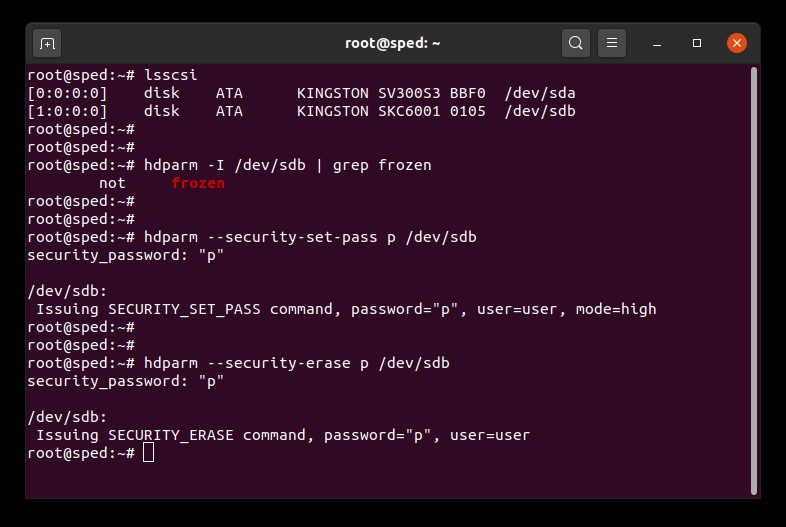
1. ค้นหาชื่ออุปกรณ์ (/dev/sdX) ของไดรฟ์ที่ต้องการลบ:
# lsscsi2. ระบบรักษาความปลอดภัยของไดรฟ์จะต้องไม่ถูกล็อคค้างอยู่:
# hdparm -I /dev/sdX | grep frozenหากข้อมูลแจ้งว่า “frozen” (แทนที่จะเป็น “not frozen”) คุณจะไม่สามารถเข้าสู่ขั้นตอนต่อไปได้ คุณจะต้องลองแก้ไขปัญหาการล็อคระบบรักษาความปลอดภัยตามหนึ่งในวิธีต่าง ๆ ต่อไปนี้
วิธีที่ 1:
ให้เครื่องเข้าสู่โหมดสลีป (ระงับการทำงานของ RAM) แล้วปลุกการทำงานขึ้นมาใหม่ สำหรับเครื่องส่วนใหญ่ คำสั่งในการระงับคือ:
# systemctl suspendจากนั้นใช้คำสั่ง hdparm อีกครั้ง หากสำเร็จ จะมีข้อความแจ้งว่า "not frozen" (แทนคำว่า "frozen")
วิธีที่ 2:
เสียบต่อไดรฟ์ในขณะที่เครื่องทำงานอยู่ ทำได้โดยการถอดสายจ่ายไฟของ SATA จากไดรฟ์แล้วเสียบกลับเข้าไปขณะที่เครื่องทำงาน คุณอาจต้องเปิดใช้งานระบบ Hot Plug ใน BIOS เครื่องบางรุ่นเท่านั้นที่รองรับ Hot Plug
จากนั้นใช้คำสั่ง hdparm อีกครั้ง หากสำเร็จ จะมีข้อความแจ้งว่า "not frozen" (แทนคำว่า "frozen")
3. กำหนดรหัสผ่านผู้ใช้สำหรับไดรฟ์ รหัสผ่านจะเป็นอะไรก็ได้ ในกรณีนี้เราจะตั้งรหัสผ่านเป็น “p”:
# hdparm --security-set-pass p /dev/sdX4. ส่งคำสั่ง secure erase ไปยังไดรฟ์โดยใช้รหัสผ่านเดียวกัน: 1234567890 - 1234567890 -
# hdparm --security-erase p /dev/sdXคำสั่งนี้อาจใช้เวลาดำเนินการอยู่ครู่หนึ่ง รหัสผ่านสำหรับไดรฟ์จะถูกลบทิ้งเมื่อดำเนินการเสร็จสิ้น หากการลบข้อมูลแบบปลอดภัยขัดข้องหรือไม่สำเร็จ ระบบอาจล็อคเพื่อรักษาความปลอดภัยของไดรฟ์คุณ ในกรณีนี้คุณสามารถปิดระบบล็อคความปลอดภัยที่ค้างอยู่ผ่านคำสั่งต่อไปนี้แล้วลองทำการลบข้อมูลอย่างปลอดภัยใหม่อีกครั้ง:
# hdparm --security-disable p /dev/sdXตัวอย่างการลบข้อมูล SATA แบบปลอดภัย
กระบวนการลบข้อมูล NVMe อย่างปลอดภัย
คำเตือน
อย่าลืมสำรองข้อมูลสำคัญ ๆ ก่อนดำเนินขั้นตอนนี้!
เงื่อนไขเบื้องต้น
- คุณจะต้องมีสิทธิ์สั่งการระดับราก
- คุณจะต้องเชื่อมต่อ SSD กับเครื่องเป็นไดรฟ์สำรอง (non-OS)
- คุณจะต้องติดตั้ง nvme-cli ไว้ คุณอาจต้องทำการติดตั้งโดยใช้ตัวจัดการแพ็กเกจที่จัดมาให้กับอุปกรณ์
- ไดรฟ์จะต้องไม่มีการป้องกันรหัสผ่านไว้
คำแนะนำ
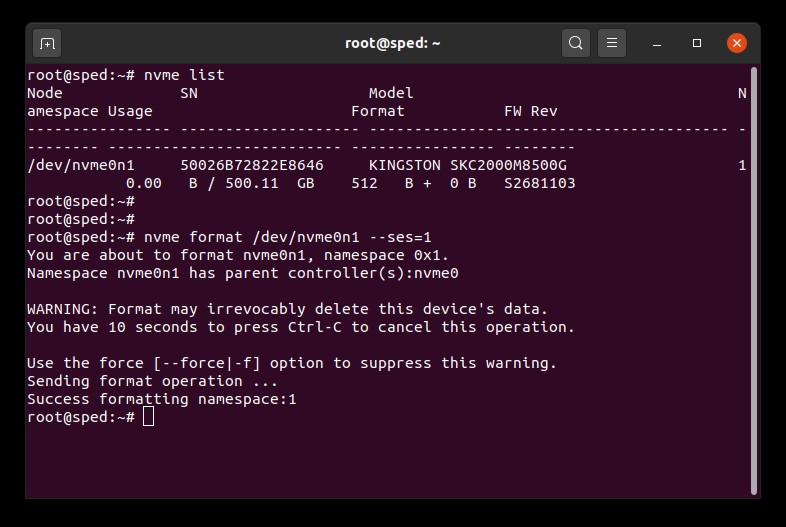
1. ค้นหาชื่ออุปกรณ์ (/dev/nvmeXn1) ของไดรฟ์ที่ต้องการลบ:
# nvme list
2. ใช้คำสั่ง format กับไดรฟ์ จากนี้เราจะตั้งค่าการลบข้อมูลแบบปลอดภัยเป็น 1 เพื่อแจ้งให้ทำการลบข้อมูลของผู้ใช้:
# nvme format /dev/nvmeXn1 --ses=1คำสั่งนี้อาจใช้เวลาดำเนินการอยู่ครู่หนึ่ง
ตัวอย่างการลบข้อมูล NVMe แบบปลอดภัย
FAQ: KSM-SE-LIX
เฟิร์มแวร์ SSD คือซอฟต์แวร์ที่อยู่ใน SSD และทำหน้าที่จัดการการทำงานของไดรฟ์ รวมทั้งสื่อสารกับระบบโฮสต์ จัดเก็บและเรียกค้นข้อมูล ปรับระดับความสึกหรอให้เสมอกัน และแก้ไขข้อผิดพลาด
หาก SSD ของคุณต้องอัปเดตเป็นเฟิร์มแวร์ล่าสุด คุณจะได้รับการแจ้งเตือนตอนที่เปิดซอฟต์แวร์ SSD Manager ของ Kingston.
FAQ: KSD-012010-001-11
Trim และ Garbage Collection คือเทคโนโลยีที่ SSD รุ่นใหม่ใช้เพื่อปรับปรุงประสิทธิภาพและความทนทานในการใช้งาน หากคุณใช้ SSD ใหม่ บล็อค NAND ทั้งหมดจะยังไม่มีข้อมูล ดังนั้น SSD จะสามารถเขียนข้อมูลใหม่ไปยังบล็อคเปล่าได้ในการทำงานหนึ่งครั้ง เมื่อผ่านไปบล็อคข้อมูลเปล่าก็จะถูกใช้งานและเก็บข้อมูลผู้ใช้ไว้ เพื่อเขียนข้อมูลใหม่ลงไปยังบล็อคที่ใช้งานแล้ว SSD จะต้องทำงานเป็นรอบการอ่าน-แก้ไข-เขียนข้อมูล รอบการอ่าน-แก้ไข-เขียนข้อมูลมีผลกระทบต่อ SSD โดยรวมเนื่องจากจะต้องทำงานถึงสามอย่างแทนที่จะเป็นเพียงอย่างเดียว รอบการอ่าน-แก้ไข-เขียนข้อมูลจะทำให้เกิดภาระอย่างมากต่อ SSD และความทนทานของไดร์ฟโดยรวม
Trim และ Garbage Collection จะทำงานประสานกันเพื่อเพิ่มประสิทธิภาพให้แก่ SSD และความทนทานของไดร์ฟโดยการเพิ่มพื้นที่ให้แก่บล็อคข้อมูลที่ถูกใช้งานแล้ว Garbage Collection เป็นฟังก์ชั่นสำเร็จในระบบควบคุม SSD โดยจะรวบรวมข้อมูลที่จัดเก็บไว้ในบล็อคที่ใช้งานแล้วเข้าด้วยกันเพื่อให้มีบล็อคเปล่าสำหรับใช้งาน กระบวนการนี้จะเกิดขึ้นอยู่เบื้องหลังและจัดการโดย SSD เองทั้งหมด
อย่างไรก็ตาม SSD อาจไม่ทราบว่าบล็อคข้อมูลใดที่มีข้อมูลผู้ใช้และบล็อคข้อมูลใดที่มีข้อมูลที่ผู้ใช้ลบทิ้งไปแล้ว นี่เป็นจุดที่การทำงานแบบ Trim เข้ามาดูแล โดย Trim จะช่วยให้ระบบปฏิบัติการสามารถแจ้งกับ SSD ว่าข้อมูลใดที่ถูกลบเพื่อให้ SSD สามารถเพิ่มพื้นที่ให้กับบล็อคข้อมูลที่เคยถูกใช้งานก่อนหน้านี้
ในการทำงานระบบปฏิบัติการและตัว SSD เองจะต้องรองรับฟังก์ชั่นนี้ด้วย ปัจจุบันระบบปฏิบัติการและ SSD รุ่นใหม่ ๆ จะรองรับ Trim แต่โครงร่างการทำงาน RAID ส่วนใหญ่ยังไม่รองรับ
Kingston SSD ใช้ประโยชน์จากเทคโนโลยี Garbage Collection และ Trim เพื่อรักษาประสิทธิภาพและความทนทานตลอดอายุการใช้งานของไดร์ฟ
FAQ: KSD-011411-GEN-13
M.2 เป็นฟอร์มแฟคเตอร์ทางกายภาพ SATA และ PCIe คืออินเทอร์เฟซสำหรับสื่อบันทึกข้อมูล ข้อแตกต่างหลัก ๆ คือประสิทธิภาพและโปรโตคอล (ภาษา) ที่ใช้โดย M.2 SSD
รายละเอียดทางเทคนิคของ M.2 ออกแบบมาเพื่อรองรับทั้งอินเทอร์เฟซ SATA และ PCIe สำหรับ SSD M.2 SATA SSD จะใช้ชุดควบคุมเดียวกับที่ใช้ใน SATA SSD ขนาด 2.5 นิ้วในปัจจุบัน M.2 PCIe SSD จะใช้ชุดควบคุมที่ออกแบบมาโดยเฉพาะสำหรับรองรับโปรโตคอล PCIe M.2 SSD รองรับโปรโตคอลเพียงแบบเดียว แต่เครื่องบางเครื่องอาจมีซ็อคเก็ต M.2 ที่รองรับทั้ง SATA หรือ PCIe
FAQ: KSD-004005-001-00
ElectroStatic Discharge, ESD คือการถ่ายประจำของประจุไฟฟ้าสถิตสะสมทั่วไป ESD เป็นปัญหาที่จะต้องใส่ใจเนื่องจากเป็นสิ่งที่อาจทำความเสียหายหรือทำลายส่วนประกอบของคอมพิวเตอร์หรือฮาร์ดแวร์ได้ เหมือนกับการถูเท้าบนพรมแล้วเตะโลหะเข้า ESD อาจเกิดขึ้นโดยที่ผู้ใช้ไม่จำเป็นต้องรู้สึกว่าถูกช็อต และจะเกิดขึ้นก็ต่อเมื่อมีการดำเนินการใด ๆ ภายในคอมพิวเตอร์หรือชิ้นส่วนฮาร์ดแวร์
วิธีป้องกัน ESD
วิธีที่ดีที่สุดในการป้องกัน ESD คือใช้สายคล้องข้อมือป้องกัน ESD หรือพรมหรือโต๊ะกราวด์ เนื่องจากผู้ใช้ส่วนใหญ่ไม่มีอุปกรณ์เหล่านี้ เราจึงได้จัดทำคำแนะนำต่อไปนี้เพื่อช่วยในการลดปัญหาโอกาสการเกิด ESD ให้มากที่สุด
- การยืน - แนะนำให้ยืนตลอดเวลาระหว่างดำเนินการกับคอมพิวเตอร์ การนั่งบนเก้าอี้มีโอกาสทำให้เกิดไฟฟ้าสถิตได้มากกว่า
- สายต่อ - นำสายต่อต่าง ๆ ออกจากด้านหลังคอมพิวเตอร์ (สายไฟ เมาส์ แป้นพิมพ์ ฯลฯ)
- เสื้อผ้า - อย่าสวมเสื้อผ้าที่นำไฟฟ้ามาก เช่น เสื้อขนสัตว์
- เครื่องประดับ - เพื่อลด ESD และป้องกันปัญหาอื่น ๆ แนะนำให้นำเครื่องประดับออก
- สภาพอากาศ - ฝนฟ้าคะนองจะเพิ่มโอกาสในการเกิด ESD พยายามอย่าดำเนินการใด ๆ กับคอมพิวเตอร์ในช่วงฝนฟ้าคะนอง ยกเว้นไม่สามารถหลีกเลี่ยงได้ แม้ในสภาพอากาศแห้ง อากาศก็อาจทำให้เกิดไฟฟ้าสถิตทุกครั้งที่มีการไหลของกระแสอากาศ (ลม เครื่องปรับอากาศ พัดลม) ที่พัดผ่านพื้นผิวที่มีฉนวน ความชื้นสูงไม่ควรทำให้ประมาท ระมัดระวังปัญหาการสึกกร่อนกับส่วนต่อเชื่อมและหน้าสัมผัสทางไฟฟ้าต่าง ๆ
ดูรายละเอียดเพิ่มเติมเกี่ยวกับ ESD และการปกป้องอุปกรณ์อิเล็กทรอนิกส์ของคุณได้จากไซต์ต่อไปนี้
ESD Association
https://www.esda.org
FAQ: KTC-Gen-ESD
โปรดดูคู่มือของเราเกี่ยวกับความแตกต่างระหว่าง SSD แบบ NVMe และ SATA
FAQ: KSD-012010-001-19
โปรดดูคู่มือของเราเกี่ยวกับความแตกต่างระหว่างโซลิดสเตทไดรฟ์และฮาร์ดดิสก์ไดรฟ์
FAQ: KSD-012010-001-29
Kingston แนะนำให้อัปเดต SSD ของคุณเป็นเฟิร์มแวร์เวอร์ชันล่าสุดที่มีให้ใช้งานหากเป็นไปได้ คุณสามารถตรวจสอบว่าไดรฟ์ของคุณมีการอัปเดตที่พร้อมใช้งานหรือไม่โดยใช้ซอฟต์แวร์ Kingston’s SSD Manager.
FAQ: KSD-012010-001-25
FAQ: KSM-001125-001-00
A. เครื่องของคุณอาจมีการโหลดไดรเวอร์ Intel RST แทนที่จะเป็น Microsoft NVMe ขณะนี้มีปัญหาด้านการรองรับการทำงานกับไดรเวอร์ Intel RST ที่กระทบกับคำสั่งอัปเดตเฟิร์มแวร์ของ NVMe นอกจากนี้ KSM อาจจะรองรับเฉพาะระบบที่ใช้ Windows เท่านั้น ดังนั้น หากคุณพยายามเปิด KSM บนระบบ macOS หรือ Linux ระบบปฏิบัติการเหล่านี้จะใช้ร่วมกับ KSM ไม่ได้
FAQ: KSM-001125-002-01
1. เริ่มจากสำรองข้อมูลของคุณไว้ล่วงหน้า
2. จากนั้นใช้เครื่องสำรองเพื่อเรียกใช้ REVERT ผ่าน PSID ที่ฉลากไดรฟ์ หมายเหตุ: ดำเนินขั้นตอน REVERT เพื่อลบข้อมูลทั้งหมดในไดรฟ์อย่างปลอดภัย
3. ปิดใช้งาน IEEE 1667
4. การอัพเดตเฟิร์มแวร์จะสามารถทำได้เมื่อทำการรีเฟรชหรือรีสตาร์ท KSM
FAQ: KSM-001125-001-01
โปรดระวัง! วิธีลัดต่อไปนี้จะส่งผลต่ออาร์เรย์ RST RAID และอาจทำให้ข้อมูลสูญหายได้ หากเครื่องของคุณมีอาร์เรย์ RST RAID ให้พิจารณาทางเลือกอื่น
ทางเลือกที่ 1: ปิดใช้งาน RST Control จาก BIOS
วิธีนี้จะต้องปรับค่า BIOS เพื่อเปิดหรือปิดใช้งาน RST Control และไม่สามารถทำได้กับทุกเครื่อง
หมายเหตุ: โปรดสำรองข้อมูลที่สำคัญทั้งหมดก่อนดำเนินการต่อ!
- รีสตาร์ทแล้วเข้าไปยัง BIOS เครื่อง
- ค้นหาการตั้งค่า RST Configuration จาก BIOS
- แก้ไข “RST Controlled” เป็น “Not RST Controlled”
- บันทึกแล้วออกจาก BIOS
- เปิด KSM แล้วอัพเดตเฟิร์มแวร์ของไดรฟ์
หลังจากทำตามขั้นตอนนี้แล้ว คุณสามารถเลือกสลับกลับไปที่ “RST Controlled” ได้ใน BIOS
ทางเลือกที่ 2: สลับจาก RAID เป็น AHCI ใน BIOS
วิธีการนี้ใช้เพื่อเปลี่ยนโหมดการจัดเก็บข้อมูลของเครื่องจาก RAID เป็น AHCI และควรจะใช้ได้กับทุกเครื่อง
หมายเหตุ: กรุณาสำรองข้อมูลที่สำคัญทั้งหมดก่อนดำเนินการต่อ!
- เปิด msconfig
- เลือกแท็บ Boot
- เลือก Safe boot (minimal)
- คลิก OK แล้วทำการรีสตาร์ท
- เมื่อเครื่องรีสตาร์ทให้ไปที่ BIOS เครื่อง
- เปลี่ยนโหมดการจัดเก็บข้อมูลจาก RAID เป็น AHCI
- บันทึกแล้วออกจาก BIOS
- รอให้ Windows บู๊ตใน Safe Mode
- เปิด msconfig
- เลือกแท็บ Boot
- ลบเครื่องหมายที่ Safe boot
- คลิก OK แล้วทำการรีสตาร์ท
- รอให้ Windows บู๊ตตามปกติ
- เปิด KSM แล้วอัพเดตเฟิร์มแวร์ของไดรฟ์
หลังจากทำตามขั้นตอนเหล่านี้ คุณจะสามารถสลับโหมดการจัดเก็บข้อมูลกลับเป็น RAID ได้จาก BIOS
FAQ: KSD-001525-001-01
เมื่อคุณโคลนข้อมูลไปยังไดรฟ์ใหม่ที่มีความจุมากกว่าไดรฟ์ต้นทาง ซอฟต์แวร์อาจจะคำนวณขนาดพาร์ติชันไม่ถูกต้อง หากเป็นเช่นนั้น คุณอาจลงเอยด้วยพื้นที่ที่ไม่ได้นำไปใช้งาน" เพื่อหลีกเลี่ยงปัญหานี้ โปรดปฏิบัติตามคำแนะนำการโคลนของเรา
FAQ: KSD-012010-001-04
เฟิร์มแวร์ SSD คือซอฟต์แวร์ที่อยู่ใน SSD และทำหน้าที่จัดการการทำงานของไดรฟ์ รวมทั้งสื่อสารกับระบบโฮสต์ จัดเก็บและเรียกค้นข้อมูล ปรับระดับความสึกหรอให้เสมอกัน และแก้ไขข้อผิดพลาด
หาก SSD ของคุณต้องอัปเดตเป็นเฟิร์มแวร์ล่าสุด คุณจะได้รับการแจ้งเตือนตอนที่เปิดซอฟต์แวร์ SSD Manager ของ Kingston.
FAQ: KSD-012010-001-11
FAQ: KSD-012010-001-14
FAQ: KSD-012010-001-12
FAQ: KSD-012010-001-13
เมื่อคุณโคลนข้อมูลไปยังไดรฟ์ใหม่ที่มีความจุมากกว่าไดรฟ์ต้นทาง ซอฟต์แวร์อาจจะคำนวณขนาดพาร์ติชันไม่ถูกต้อง หากเป็นเช่นนั้น คุณอาจลงเอยด้วยพื้นที่ที่ไม่ได้นำไปใช้งาน" เพื่อหลีกเลี่ยงปัญหานี้ โปรดปฏิบัติตามคำแนะนำการโคลนของเรา
FAQ: KSD-012010-001-04
หากเจอไดรฟ์ใน BIOS คุณอาจจะต้องเริ่มการทำงานของไดรฟ์ภายในระบบปฏิบัติการ
สำหรับ Windows:
ขั้นตอนที่ 1: ยืนยันว่าเชื่อมต่อไดรฟ์ถูกต้องแล้ว จากนั้นเปิดเครื่องและบู๊ตเครื่องเข้าสู่ Windows OS
ขั้นตอนที่ 2: กดปุ่ม Windows + X แล้วเลือก Disk Management
ขั้นตอนที่ 3: หากเป็น SSD ใหม่ที่ยังไม่ได้เริ่มใช้งาน หน้าต่างป๊อปอัปจะปรากฏขึ้นมา พร้อมข้อความ "Initialize Disk"
ขั้นตอนที่ 4: เลือกระหว่าง
MBR (Master Boot Record): เหมาะกับไดรฟ์ที่มีความจุไม่ถึง 2TB และอุปกรณ์แบบเก่า
GPT (GUID Partition Table): แนะนำสำหรับอุปกรณ์สมัยใหม่และไดรฟ์ที่มีความจุมากกว่า 2TB
ขั้นตอนที่ 5: คลิก “OK” เพื่อเริ่มการทำงานของดิสก์
ขั้นตอนที่ 6: หลังจากเริ่มการทำงาน คุณจะเห็นว่า SSD ของคุณเป็น "Unallocated” ให้คลิกขวา แล้วเลือก New Simple Volume
ขั้นตอนที่ 7: ทำตามคำแนะนำบนหน้าจอเพื่อฟอร์แม็ตและกำหนดตัวอักษรระบุไดรฟ์ให้กับ SSD
สำหรับ Mac OS:
ขั้นตอนที่ 1: ยืนยันว่าเชื่อมต่อไดรฟ์ถูกต้องแล้ว จากนั้นเปิดเครื่องและบู๊ตเครื่องเข้าสู่ Mac OS
ขั้นตอนที่ 2: เปิด Disk Utility (โดยใช้ Spotlight ร่วมกับปุ่ม Cmd + Space จากนั้นพิมพ์ "Disk Utility")
ขั้นตอนที่ 3: เลือก SSD ของคุณจากแผงทางซ้ายมือ
ขั้นตอนที่ 4: คลิก Erase
ขั้นตอนที่ 5: ตั้งชื่อไดรฟ์ จากนั้นเลือกตัวเลือกต่อไปนี้ใต้ Format
APFS หากเป็น Mac รุ่นเก่าและ SSD
Mac OS Extended (Journaled) หากเป็นอุปกรณ์รุ่นเก่าหรือ HDD
ขั้นตอนที่ 6: คลิก Erase หลังจากนั้น SSD ก็จะพร้อมใช้งาน
สำหรับ Linux:
ขั้นตอนที่ 1: ยืนยันว่าเชื่อมต่อไดรฟ์ถูกต้องแล้ว จากนั้นเปิดเครื่องและบู๊ตเครื่องเข้าสู่ Linux
ขั้นตอนที่ 2: เปิดเทอร์มินัล
ขั้นตอนที่ 3: ป้อนคำสั่ง sudo fdisk -l เพื่อแสดงไดรฟ์ทั้งหมดที่เชื่อมต่ออยู่ มองหา SSD ของคุณจากขนาดของไดรฟ์ แล้วจดชื่อของไดรฟ์ไว้ เช่น /dev/sdb
ขั้นตอนที่ 4: เริ่มการทำงานของไดรฟ์โดยใช้คำสั่ง fdisk หรือ parted ต่อไปนี้คือคำแนะนำเบื้องต้นในการใช้คำสั่ง fdisk:
ป้อน sudo fdisk /dev/sdb (แทนที่ /dev/sdb ด้วยชื่อไดรฟ์ SSD ของคุณ)
กด g เพื่อสร้างตารางพาร์ติชัน GPT ใหม่
กด n เพื่อสร้างตารางพาร์ติชันใหม่ ทำตามคำแนะนำบนหน้าจอเพื่อระบุขนาดและประเภทไดรฟ์
กด w เพื่อเขียนการเปลี่ยนแปลง
ขั้นตอนที่ 5: กำหนดรูปแบบพาร์ติชันใหม่บน SSD (เช่น /dev/sdb1) คุณสามารถกำหนดรูปแบบเป็นระบบไฟล์ที่ต้องการดังต่อไปนี้:
สำหรับ ext4: sudo mkfs.ext4 /dev/sdb1
สำหรับ ext3: sudo mkfs.ext3 /dev/sdb1
สำหรับ FAT32: sudo mkfs.vfat /dev/sdb1
ขั้นตอนที่ 6: ติดตั้งใช้งาน SSD:
สร้างจุดติดตั้งใช้งาน: sudo mkdir /mnt/myssd
ติดตั้งใช้งาน SSD: sudo mount /dev/sdb1 /mnt/myssd
อย่าลืมแทนที่ /dev/sdb1 ด้วยชื่อพาร์ติชันของ SSD
FAQ: KSD-012010-001-15
-ยืนยันว่า BIOS ของระบบรู้จัก SSD ตัวใหม่ แต่ถ้าไม่รู้จัก เข้าไปที่เว็บไซต์ของผู้ผลิตเมนบอร์ด / ระบบ เพื่อดูว่ามี BIOS ใหม่ล่าสุดหรือไม่
-ตรวจสอบว่า BIOS ได้รับการกำหนดค่าให้ยอมรับ NVMe SSD ตัวใหม่
-ยืนยันว่าระบบปฏิบัติการที่จะติดตั้งนั้นยอมรับ NVMe SSD (เช่น Windows 8 หรือใหม่กว่า)
หมายเหตุ: Kingston SSD ไม่ต้องใช้ไดรเวอร์เพิ่มเติมในการทำงาน
FAQ: KSD-012010-001-05
โปรดดูคู่มือของเราเกี่ยวกับเทคโนโลยี SSD แบบ M.2
FAQ: KSD-012010-001-16
กล่องดิสก์แบบต่อพ่วงมีอยู่มากมายในท้องตลาด ถึงแม้ว่า Kingston จะต้องการให้ผลิตภัณฑ์ใช้งานกับระบบทุกประเภท แต่บางครั้งผลิตภัณฑ์ของเราก็ใช้งานกับบางระบบไม่ได้
หากคุณประสบปัญหากับอุปกรณ์เชื่อมต่อ SSD ที่ไม่ใช่ของ Kingston โปรดติดต่อการรองรับทางเทคนิคของ Kingston เพื่อขอความช่วยเหลือในการแก้ไขปัญหา
FAQ: KSD-012010-001-18
เมื่อคุณโคลนข้อมูลไปยังไดรฟ์ใหม่ที่มีความจุมากกว่าไดรฟ์ต้นทาง ซอฟต์แวร์อาจจะคำนวณขนาดพาร์ติชันไม่ถูกต้อง หากเป็นเช่นนั้น คุณอาจลงเอยด้วยพื้นที่ที่ไม่ได้นำไปใช้งาน" เพื่อหลีกเลี่ยงปัญหานี้ โปรดปฏิบัติตามคำแนะนำการโคลนของเรา
FAQ: KSD-012010-001-04
โปรดดูคู่มือของเรา: การติดตั้ง M.2 SSD
โปรดทราบว่าคุณอาจต้องการโคลนไดรฟ์ที่คุณกำลังเปลี่ยน ดูคู่มือของเราในการโคลนไดรฟ์ด้วยซอฟต์แวร์ Acronis ที่มาพร้อมกัน
FAQ: KSD-012010-001-00
โปรดดูคู่มือของเรา:
- วิธีติดตั้ง SSD ภายในขนาด 2.5" นิ้ว
- โปรดทราบว่าคุณอาจต้องการโคลนไดรฟ์ที่คุณกำลังเปลี่ยน โปรดดูคู่มือของเราในการโคลนไดรฟ์ของคุณด้วยซอฟต์แวร์ Acronis ที่มาพร้อมกัน
FAQ: KSD-012010-001-01
แต่หากทำแบบนั้นไม่ได้หรือหากคุณเคยโคลนข้อมูลเก่าไปยังไดรฟ์นั้นมาก่อน ยืนยันว่าไดรฟ์ใหม่ปรากฏเป็นอุปกรณ์บู๊ตใน BIOS ของระบบ จากนั้นเลือกไดรฟ์นั้นระหว่างการบู๊ตเครื่อง
FAQ: KSD-012010-001-03
กล่องดิสก์แบบต่อพ่วงมีอยู่มากมายในท้องตลาด ถึงแม้ว่า Kingston จะต้องการให้ผลิตภัณฑ์ใช้งานกับระบบทุกประเภท แต่บางครั้งผลิตภัณฑ์ของเราก็ใช้งานกับบางระบบไม่ได้
หากคุณประสบปัญหากับอุปกรณ์เชื่อมต่อ SSD ที่ไม่ใช่ของ Kingston โปรดติดต่อการรองรับทางเทคนิคของ Kingston เพื่อขอความช่วยเหลือในการแก้ไขปัญหา
FAQ: KSD-012010-001-18
โปรดดูคู่มือของเราเกี่ยวกับเทคโนโลยี SSD แบบ M.2
FAQ: KSD-012010-001-16
-ยืนยันว่า BIOS ของระบบรู้จัก SSD ตัวใหม่ แต่ถ้าไม่รู้จัก เข้าไปที่เว็บไซต์ของผู้ผลิตเมนบอร์ด / ระบบ เพื่อดูว่ามี BIOS ใหม่ล่าสุดหรือไม่
-ตรวจสอบว่า BIOS ได้รับการกำหนดค่าให้ยอมรับ NVMe SSD ตัวใหม่
-ยืนยันว่าระบบปฏิบัติการที่จะติดตั้งนั้นยอมรับ NVMe SSD (เช่น Windows 8 หรือใหม่กว่า)
หมายเหตุ: Kingston SSD ไม่ต้องใช้ไดรเวอร์เพิ่มเติมในการทำงาน
FAQ: KSD-012010-001-05
ปกติแล้ว Windows 7 ไม่รองรับ NVMe SSD โปรดดูคำอธิบายการแก้ไขของ Microsoft สำหรับการติดตั้ง Windows 7 บน NVMe SSD ของคุณ
FAQ: KSD-012010-001-06
เฟิร์มแวร์ SSD คือซอฟต์แวร์ที่อยู่ใน SSD และทำหน้าที่จัดการการทำงานของไดรฟ์ รวมทั้งสื่อสารกับระบบโฮสต์ จัดเก็บและเรียกค้นข้อมูล ปรับระดับความสึกหรอให้เสมอกัน และแก้ไขข้อผิดพลาด
หาก SSD ของคุณต้องอัปเดตเป็นเฟิร์มแวร์ล่าสุด คุณจะได้รับการแจ้งเตือนตอนที่เปิดซอฟต์แวร์ SSD Manager ของ Kingston.
FAQ: KSD-012010-001-11
FAQ: KSD-012010-001-07
หากเจอไดรฟ์ใน BIOS คุณอาจจะต้องเริ่มการทำงานของไดรฟ์ภายในระบบปฏิบัติการ
สำหรับ Windows:
ขั้นตอนที่ 1: ยืนยันว่าเชื่อมต่อไดรฟ์ถูกต้องแล้ว จากนั้นเปิดเครื่องและบู๊ตเครื่องเข้าสู่ Windows OS
ขั้นตอนที่ 2: กดปุ่ม Windows + X แล้วเลือก Disk Management
ขั้นตอนที่ 3: หากเป็น SSD ใหม่ที่ยังไม่ได้เริ่มใช้งาน หน้าต่างป๊อปอัปจะปรากฏขึ้นมา พร้อมข้อความ "Initialize Disk"
ขั้นตอนที่ 4: เลือกระหว่าง
MBR (Master Boot Record): เหมาะกับไดรฟ์ที่มีความจุไม่ถึง 2TB และอุปกรณ์แบบเก่า
GPT (GUID Partition Table): แนะนำสำหรับอุปกรณ์สมัยใหม่และไดรฟ์ที่มีความจุมากกว่า 2TB
ขั้นตอนที่ 5: คลิก “OK” เพื่อเริ่มการทำงานของดิสก์
ขั้นตอนที่ 6: หลังจากเริ่มการทำงาน คุณจะเห็นว่า SSD ของคุณเป็น "Unallocated” ให้คลิกขวา แล้วเลือก New Simple Volume
ขั้นตอนที่ 7: ทำตามคำแนะนำบนหน้าจอเพื่อฟอร์แม็ตและกำหนดตัวอักษรระบุไดรฟ์ให้กับ SSD
สำหรับ Mac OS:
ขั้นตอนที่ 1: ยืนยันว่าเชื่อมต่อไดรฟ์ถูกต้องแล้ว จากนั้นเปิดเครื่องและบู๊ตเครื่องเข้าสู่ Mac OS
ขั้นตอนที่ 2: เปิด Disk Utility (โดยใช้ Spotlight ร่วมกับปุ่ม Cmd + Space จากนั้นพิมพ์ "Disk Utility")
ขั้นตอนที่ 3: เลือก SSD ของคุณจากแผงทางซ้ายมือ
ขั้นตอนที่ 4: คลิก Erase
ขั้นตอนที่ 5: ตั้งชื่อไดรฟ์ จากนั้นเลือกตัวเลือกต่อไปนี้ใต้ Format
APFS หากเป็น Mac รุ่นเก่าและ SSD
Mac OS Extended (Journaled) หากเป็นอุปกรณ์รุ่นเก่าหรือ HDD
ขั้นตอนที่ 6: คลิก Erase หลังจากนั้น SSD ก็จะพร้อมใช้งาน
สำหรับ Linux:
ขั้นตอนที่ 1: ยืนยันว่าเชื่อมต่อไดรฟ์ถูกต้องแล้ว จากนั้นเปิดเครื่องและบู๊ตเครื่องเข้าสู่ Linux
ขั้นตอนที่ 2: เปิดเทอร์มินัล
ขั้นตอนที่ 3: ป้อนคำสั่ง sudo fdisk -l เพื่อแสดงไดรฟ์ทั้งหมดที่เชื่อมต่ออยู่ มองหา SSD ของคุณจากขนาดของไดรฟ์ แล้วจดชื่อของไดรฟ์ไว้ เช่น /dev/sdb
ขั้นตอนที่ 4: เริ่มการทำงานของไดรฟ์โดยใช้คำสั่ง fdisk หรือ parted ต่อไปนี้คือคำแนะนำเบื้องต้นในการใช้คำสั่ง fdisk:
ป้อน sudo fdisk /dev/sdb (แทนที่ /dev/sdb ด้วยชื่อไดรฟ์ SSD ของคุณ)
กด g เพื่อสร้างตารางพาร์ติชัน GPT ใหม่
กด n เพื่อสร้างตารางพาร์ติชันใหม่ ทำตามคำแนะนำบนหน้าจอเพื่อระบุขนาดและประเภทไดรฟ์
กด w เพื่อเขียนการเปลี่ยนแปลง
ขั้นตอนที่ 5: กำหนดรูปแบบพาร์ติชันใหม่บน SSD (เช่น /dev/sdb1) คุณสามารถกำหนดรูปแบบเป็นระบบไฟล์ที่ต้องการดังต่อไปนี้:
สำหรับ ext4: sudo mkfs.ext4 /dev/sdb1
สำหรับ ext3: sudo mkfs.ext3 /dev/sdb1
สำหรับ FAT32: sudo mkfs.vfat /dev/sdb1
ขั้นตอนที่ 6: ติดตั้งใช้งาน SSD:
สร้างจุดติดตั้งใช้งาน: sudo mkdir /mnt/myssd
ติดตั้งใช้งาน SSD: sudo mount /dev/sdb1 /mnt/myssd
อย่าลืมแทนที่ /dev/sdb1 ด้วยชื่อพาร์ติชันของ SSD
FAQ: KSD-012010-001-15
FAQ: KSD-012010-001-14
FAQ: KSD-012010-001-13
FAQ: KSD-012010-001-12