
IronKey Vault Privacy 80 Encrypted External SSD - Hỗ trợ
Tài nguyên
Video


Các câu hỏi thường gặp
Đây là điều bình thường với bộ lưu trữ flash, cho dù là ổ SSD trong hay bộ lưu trữ USB ngoài. Điều này một phần là do sự khác biệt trong cách nhà sản xuất bộ nhớ flash và ổ cứng đĩa quay tính toán megabyte. Nhà sản xuất ổ cứng tính toán một megabyte (hay 1.000x1.000 byte) bằng 1.000 KB, trong khi đó tính toán nhị phân cho bộ lưu trữ flash là 1.024 KB.
Ví dụ: Đối với thiết bị lưu trữ dựa trên flash có dung lượng 1 TB, Windows sẽ tính toán dung lượng là 931,32 GB. (1.000.000.000.000÷1.024÷1.024÷1.024=931,32 GB).
goài ra, Kingston dành một phần dung lượng cho việc định dạng và các chức năng khác như vi chương trình và/hoặc thông tin cụ thể cho bộ điều khiển. Do đó, một phần dung lượng không dành cho việc lưu trữ dữ liệu.
FAQ: KDT-010611-GEN-06
Nếu cách này không có tác dụng, hoặc nếu trước đây bạn đã từng sao chép dữ liệu cũ của mình sang ổ mới, thì bạn hãy xác nhận ổ mới làm thiết bị khởi động trong BIOS hệ thống, rồi chọn ổ đó để khởi động.
FAQ: KSD-012010-001-03
Nếu ổ xuất hiện trong BIOS, bạn có thể cần phải khởi tạo đĩa trong hệ điều hành.
Đối với Windows:
Bước 1: Xác nhận ổ được gắn đúng cách, bật nguồn hệ điều hành rồi khởi động vào HĐH Windows.
Bước 2: Nhấn Windows + X và chọn Quản lý đĩa (Disk Management).
Bước 3: Nếu SSD mới và chưa được khởi tạo, cửa sổ bật lên sẽ xuất hiện, yêu cầu “Khởi tạo đĩa (Initialize Disk)”.
Bước 4: Chọn một trong hai:
MBR (Bản ghi quản lý khởi động): Phù hợp với ổ dưới 2 TB và hệ điều hành cũ hơn.
GPT (Bảng phân vùng GUID): Khuyến nghị cho các hệ thống hiện đại và ổ lớn hơn 2 TB.
Bước 5: Nhấp OK để khởi tạo đĩa.
Bước 6: Sau khi được khởi tạo, bạn sẽ thấy SSD ở trạng thái “Chưa được phân bổ (Unallocated)”. Nhấp chuột phải vào ổ và chọn Phân vùng ổ đơn mới (New Simple Volume).
Bước 7: Thực hiện theo lời nhắc trên màn hình để định dạng và chỉ định tên ổ cho SSD.
Đối với Mac OS:
Bước 1: Xác nhận ổ được gắn đúng cách, bật nguồn hệ điều hành rồi khởi động vào Mac OS.
Bước 2: Mở Tiện ích ổ đĩa (Disk Utility) (bạn có thể tìm thấy bằng cách dùng Spotlight với Cmd + Space rồi gõ “Tiện ích ổ đĩa (Disk Utility)”).
Bước 3: Từ bảng điều khiển bên trái, chọn ổ SSD của bạn.
Bước 4: Nhấp vào Xóa (Erase).
Bước 5: Cung cấp tên cho ổ. Dưới phần Format (Định dạng), chọn:
APFS cho các máy Mac và ổ SSD mới hơn.
Mac OS Extended (Journaled) cho các hệ thống hoặc HDD cũ hơn.
Bước 6: Nhấp vào Xóa (Erase). Một khi quy trình kết thúc, ổ SSD sẽ sẵn sàng sử dụng.
Đối với Linux:
Bước 1: Xác nhận ổ được gắn đúng cách, bật nguồn hệ điều hành rồi khởi động vào HĐH Linux.
Bước 2: Mở cửa sổ dòng lệnh.
Bước 3: Nhập sudo fdisk -l để liệt kê tất cả thiết bị được kết nối. Xác định ổ SSD theo kích thước và ghi lại tên thiết bị, ví dụ: /dev/sdb.
Bước 4: Khởi tạo SSD bằng cách sử dụng fdisk hoặc parted. Dưới đây là hướng dẫn sử dụng fdisk cơ bản:
Nhập sudo fdisk /dev/sdb (thay /dev/sdb bằng tên thiết bị SSD của bạn).
Nhấn g để tạo một bảng phân vùng GPT mới.
Nhấn n để tạo một phân vùng mới. Thực hiện theo lời nhắc để chỉ định kích thước và loại.
Nhấn w để ghi thay đổi.
Bước 5: Định dạng phân vùng mới trên ổ SSD (ví dụ: /dev/sdb1). Bạn có thể định dạng với filesystem tùy theo mong muốn:
Đối với ext4: sudo mkfs.ext4 /dev/sdb1
Đối với ext3: sudo mkfs.ext3 /dev/sdb1
Đối với FAT32: sudo mkfs.vfat /dev/sdb1
Bước 6: Gắn ổ SSD:
Tạo một điểm gắn: sudo mkdir /mnt/myssd
Gắn ổ SSD: sudo mount /dev/sdb1 /mnt/myssd
Hãy nhớ thay /dev/sdb1 bằng tên phân vùng SSD của bạn.
FAQ: KSD-012010-001-15
Phần mềm điều khiển ổ SSD là phần mềm tích hợp trong ổ SSD để quản lý các hoạt động của ổ, bao gồm giao tiếp với hệ thống máy chủ, lưu trữ và truy xuất dữ liệu, cân bằng độ hao mòn và sửa lỗi.
Nếu ổ SSD của bạn yêu cầu phần mềm điều khiển mới, bạn sẽ nhận được thông báo khi chạy phần mềm SSD Manager của Kingston.
FAQ: KSD-012010-001-11
Vui lòng xem hướng dẫn của chúng tôi về sự khác biệt giữa ổ SSD NVMe và SATA.
FAQ: KSD-012010-001-19
Khi sao chép tới một ổ lớn hơn ổ nguồn, phần mềm có thể không thay đổi kích thước phân vùng một cách phù hợp. Khi đó, bạn có thể rơi vào trường hợp không gian lưu trữ chưa được sử dụng. Để tránh tình trạng này, vui lòng làm theo hướng dẫn sao chép của chúng tôi.
FAQ: KSD-012010-001-04
Phần mềm điều khiển ổ SSD là phần mềm tích hợp trong ổ SSD để quản lý các hoạt động của ổ, bao gồm giao tiếp với hệ thống máy chủ, lưu trữ và truy xuất dữ liệu, cân bằng độ hao mòn và sửa lỗi.
Nếu ổ SSD của bạn yêu cầu phần mềm điều khiển mới, bạn sẽ nhận được thông báo khi chạy phần mềm SSD Manager của Kingston.
FAQ: KSD-012010-001-11
FAQ: KSD-012010-001-12
FAQ: KSD-012010-001-13
FAQ: KSD-012010-001-14
Khi sao chép tới một ổ lớn hơn ổ nguồn, phần mềm có thể không thay đổi kích thước phân vùng một cách phù hợp. Khi đó, bạn có thể rơi vào trường hợp không gian lưu trữ chưa được sử dụng. Để tránh tình trạng này, vui lòng làm theo hướng dẫn sao chép của chúng tôi.
FAQ: KSD-012010-001-04
Disabling Windows 10/11 Power Save
NOTE: You will need to complete the following steps once for each drive plugged into your computer.
1. Log in as a local administrator on your computer.
NOTE: If you are not an administrator on Windows, you will receive a warning indicating you won’t be able to make changes when you open Device Manager. Please contact your
administrator for further assistance if required.
2. Unlock your VP80ES drive.
3. Right click the Start button and select “Device Manager”.
4. Click on the arrow next to “Universal Serial Bus controllers”.
5. Right click on “USB Mass Storage Drive”.
6. Click “Properties”.
7. Click the “Power Management” tab.
8. Uncheck “Allow the computer to turn off this drive to save power”.
9. Click OK and close the “Device Manager” window.
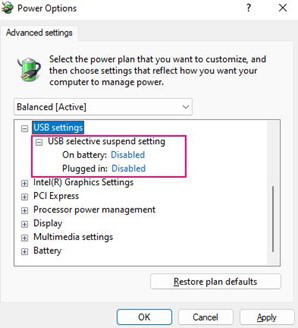
Disabling Windows 10/11 Selective Suspend
1. In the search box on the taskbar, type control panel.
2. Click and Open Control Panel.
3. Click on Hardware and Sound.
4. Click on Power Options.
5. Click the Change plan settings link for the plan you’re currently using.
6. Click the Change advanced power settings link.
7. Click (+) next to “USB settings”.
8. Click (+) next to “USB selective suspend setting”.
9. Select “Disabled” from the drop-down menu.
NOTE: If you are using a device with a battery (i.e., laptop or tablet), you will need to set this for On Battery and Plugged in.
10. Click Apply to save settings and click OK.
You’re All Set!
If the steps above resolved your problem, you’re all set!
If you still experience lock-ups, proceed to the trouble-shooting tips below.
(Trouble-shooting Tips)
I’ve completed the steps above, but my VP80ES continues to lock after short periods of inactivity. What else can I do?
If you have a high capacity IronKey VP80ES (e.g., 2TB and above), you may also need to disable the Hard Disk power save option to prevent the drive from locking unexpectedly. See steps 1-10 below.
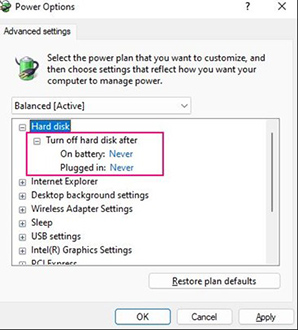
Disabling Windows 10/11 Turn off hard disk power save
1. In the search box on the taskbar, type control panel.
2. Click and Open Control Panel.
3. Click on Hardware and Sound.
4. Click on Power Options.
5. Click the Change plan settings link for the plan you’re currently using.
6. Click the Change advanced power settings link.
7. Click (+) next to “Hard Disk”
8. Click (+) next to “Turn off hard disk after”
9. Click the down button Set both “On Battery” and “Plugged in” options to “Never”
10. Click Apply to save settings and click OK.
FAQ: KSD-002202-011.01
Nếu ổ xuất hiện trong BIOS, bạn có thể cần phải khởi tạo đĩa trong hệ điều hành.
Đối với Windows:
Bước 1: Xác nhận ổ được gắn đúng cách, bật nguồn hệ điều hành rồi khởi động vào HĐH Windows.
Bước 2: Nhấn Windows + X và chọn Quản lý đĩa (Disk Management).
Bước 3: Nếu SSD mới và chưa được khởi tạo, cửa sổ bật lên sẽ xuất hiện, yêu cầu “Khởi tạo đĩa (Initialize Disk)”.
Bước 4: Chọn một trong hai:
MBR (Bản ghi quản lý khởi động): Phù hợp với ổ dưới 2 TB và hệ điều hành cũ hơn.
GPT (Bảng phân vùng GUID): Khuyến nghị cho các hệ thống hiện đại và ổ lớn hơn 2 TB.
Bước 5: Nhấp OK để khởi tạo đĩa.
Bước 6: Sau khi được khởi tạo, bạn sẽ thấy SSD ở trạng thái “Chưa được phân bổ (Unallocated)”. Nhấp chuột phải vào ổ và chọn Phân vùng ổ đơn mới (New Simple Volume).
Bước 7: Thực hiện theo lời nhắc trên màn hình để định dạng và chỉ định tên ổ cho SSD.
Đối với Mac OS:
Bước 1: Xác nhận ổ được gắn đúng cách, bật nguồn hệ điều hành rồi khởi động vào Mac OS.
Bước 2: Mở Tiện ích ổ đĩa (Disk Utility) (bạn có thể tìm thấy bằng cách dùng Spotlight với Cmd + Space rồi gõ “Tiện ích ổ đĩa (Disk Utility)”).
Bước 3: Từ bảng điều khiển bên trái, chọn ổ SSD của bạn.
Bước 4: Nhấp vào Xóa (Erase).
Bước 5: Cung cấp tên cho ổ. Dưới phần Format (Định dạng), chọn:
APFS cho các máy Mac và ổ SSD mới hơn.
Mac OS Extended (Journaled) cho các hệ thống hoặc HDD cũ hơn.
Bước 6: Nhấp vào Xóa (Erase). Một khi quy trình kết thúc, ổ SSD sẽ sẵn sàng sử dụng.
Đối với Linux:
Bước 1: Xác nhận ổ được gắn đúng cách, bật nguồn hệ điều hành rồi khởi động vào HĐH Linux.
Bước 2: Mở cửa sổ dòng lệnh.
Bước 3: Nhập sudo fdisk -l để liệt kê tất cả thiết bị được kết nối. Xác định ổ SSD theo kích thước và ghi lại tên thiết bị, ví dụ: /dev/sdb.
Bước 4: Khởi tạo SSD bằng cách sử dụng fdisk hoặc parted. Dưới đây là hướng dẫn sử dụng fdisk cơ bản:
Nhập sudo fdisk /dev/sdb (thay /dev/sdb bằng tên thiết bị SSD của bạn).
Nhấn g để tạo một bảng phân vùng GPT mới.
Nhấn n để tạo một phân vùng mới. Thực hiện theo lời nhắc để chỉ định kích thước và loại.
Nhấn w để ghi thay đổi.
Bước 5: Định dạng phân vùng mới trên ổ SSD (ví dụ: /dev/sdb1). Bạn có thể định dạng với filesystem tùy theo mong muốn:
Đối với ext4: sudo mkfs.ext4 /dev/sdb1
Đối với ext3: sudo mkfs.ext3 /dev/sdb1
Đối với FAT32: sudo mkfs.vfat /dev/sdb1
Bước 6: Gắn ổ SSD:
Tạo một điểm gắn: sudo mkdir /mnt/myssd
Gắn ổ SSD: sudo mount /dev/sdb1 /mnt/myssd
Hãy nhớ thay /dev/sdb1 bằng tên phân vùng SSD của bạn.
FAQ: KSD-012010-001-15
Khi sao chép tới một ổ lớn hơn ổ nguồn, phần mềm có thể không thay đổi kích thước phân vùng một cách phù hợp. Khi đó, bạn có thể rơi vào trường hợp không gian lưu trữ chưa được sử dụng. Để tránh tình trạng này, vui lòng làm theo hướng dẫn sao chép của chúng tôi.
FAQ: KSD-012010-001-04
Nếu cách này không có tác dụng, hoặc nếu trước đây bạn đã từng sao chép dữ liệu cũ của mình sang ổ mới, thì bạn hãy xác nhận ổ mới làm thiết bị khởi động trong BIOS hệ thống, rồi chọn ổ đó để khởi động.
FAQ: KSD-012010-001-03
FAQ: KSD-012010-001-14
FAQ: KSD-012010-001-13
FAQ: KSD-012010-001-12
Phần mềm điều khiển ổ SSD là phần mềm tích hợp trong ổ SSD để quản lý các hoạt động của ổ, bao gồm giao tiếp với hệ thống máy chủ, lưu trữ và truy xuất dữ liệu, cân bằng độ hao mòn và sửa lỗi.
Nếu ổ SSD của bạn yêu cầu phần mềm điều khiển mới, bạn sẽ nhận được thông báo khi chạy phần mềm SSD Manager của Kingston.
FAQ: KSD-012010-001-11
Nếu ổ xuất hiện trong BIOS, bạn có thể cần phải khởi tạo đĩa trong hệ điều hành.
Đối với Windows:
Bước 1: Xác nhận ổ được gắn đúng cách, bật nguồn hệ điều hành rồi khởi động vào HĐH Windows.
Bước 2: Nhấn Windows + X và chọn Quản lý đĩa (Disk Management).
Bước 3: Nếu SSD mới và chưa được khởi tạo, cửa sổ bật lên sẽ xuất hiện, yêu cầu “Khởi tạo đĩa (Initialize Disk)”.
Bước 4: Chọn một trong hai:
MBR (Bản ghi quản lý khởi động): Phù hợp với ổ dưới 2 TB và hệ điều hành cũ hơn.
GPT (Bảng phân vùng GUID): Khuyến nghị cho các hệ thống hiện đại và ổ lớn hơn 2 TB.
Bước 5: Nhấp OK để khởi tạo đĩa.
Bước 6: Sau khi được khởi tạo, bạn sẽ thấy SSD ở trạng thái “Chưa được phân bổ (Unallocated)”. Nhấp chuột phải vào ổ và chọn Phân vùng ổ đơn mới (New Simple Volume).
Bước 7: Thực hiện theo lời nhắc trên màn hình để định dạng và chỉ định tên ổ cho SSD.
Đối với Mac OS:
Bước 1: Xác nhận ổ được gắn đúng cách, bật nguồn hệ điều hành rồi khởi động vào Mac OS.
Bước 2: Mở Tiện ích ổ đĩa (Disk Utility) (bạn có thể tìm thấy bằng cách dùng Spotlight với Cmd + Space rồi gõ “Tiện ích ổ đĩa (Disk Utility)”).
Bước 3: Từ bảng điều khiển bên trái, chọn ổ SSD của bạn.
Bước 4: Nhấp vào Xóa (Erase).
Bước 5: Cung cấp tên cho ổ. Dưới phần Format (Định dạng), chọn:
APFS cho các máy Mac và ổ SSD mới hơn.
Mac OS Extended (Journaled) cho các hệ thống hoặc HDD cũ hơn.
Bước 6: Nhấp vào Xóa (Erase). Một khi quy trình kết thúc, ổ SSD sẽ sẵn sàng sử dụng.
Đối với Linux:
Bước 1: Xác nhận ổ được gắn đúng cách, bật nguồn hệ điều hành rồi khởi động vào HĐH Linux.
Bước 2: Mở cửa sổ dòng lệnh.
Bước 3: Nhập sudo fdisk -l để liệt kê tất cả thiết bị được kết nối. Xác định ổ SSD theo kích thước và ghi lại tên thiết bị, ví dụ: /dev/sdb.
Bước 4: Khởi tạo SSD bằng cách sử dụng fdisk hoặc parted. Dưới đây là hướng dẫn sử dụng fdisk cơ bản:
Nhập sudo fdisk /dev/sdb (thay /dev/sdb bằng tên thiết bị SSD của bạn).
Nhấn g để tạo một bảng phân vùng GPT mới.
Nhấn n để tạo một phân vùng mới. Thực hiện theo lời nhắc để chỉ định kích thước và loại.
Nhấn w để ghi thay đổi.
Bước 5: Định dạng phân vùng mới trên ổ SSD (ví dụ: /dev/sdb1). Bạn có thể định dạng với filesystem tùy theo mong muốn:
Đối với ext4: sudo mkfs.ext4 /dev/sdb1
Đối với ext3: sudo mkfs.ext3 /dev/sdb1
Đối với FAT32: sudo mkfs.vfat /dev/sdb1
Bước 6: Gắn ổ SSD:
Tạo một điểm gắn: sudo mkdir /mnt/myssd
Gắn ổ SSD: sudo mount /dev/sdb1 /mnt/myssd
Hãy nhớ thay /dev/sdb1 bằng tên phân vùng SSD của bạn.
FAQ: KSD-012010-001-15