
IronKey Vault Privacy 80 Encrypted External SSD - Dukungan
Sumber Daya
Video


Pertanyaan yang Sering Diajukan
Hal ini umum terjadi pada penyimpanan flash, baik penyimpanan SSD internal atau USB eksternal, yang sebagiannya disebabkan oleh perbedaan dalam cara menghitung megabyte antara produsen memori flash vs produsen hard disk dengan piringan berputar. Produsen hard disk menghitung satu megabyte (atau 1.000x1.000 byte) sebagai 1.000KB, sedangkan perhitungan biner untuk penyimpanan berbasis flash adalah 1.024KB.
Contoh: Untuk perangkat penyimpanan berbasis flash 1TB, Windows akan menghitungnya sebagai berkapasitas 931,32GB. (1.000.000.000.000÷1.024÷1.024÷1.024=931,32GB).
Selain itu, Kingston mencadangkan sebagian dari kapasitas yang tercantum untuk pemformatan dan fungsi lainnya seperti firmware dan/atau informasi khusus pengontrol sehingga sebagian dari kapasitas yang tercantum tidak tersedia untuk penyimpanan data.
FAQ: KDT-010611-GEN-06
Jika hal tersebut tidak memungkinkan, atau jika sebelumnya Anda telah mengklonakan data lama Anda ke drive baru tersebut, pastikan bahwa drive baru tersebut muncul sebagai perangkat boot di BIOS sistem, lalu pilih drive tersebut untuk proses boot.
FAQ: KSD-012010-001-03
FAQ: KSD-012010-001-18
Jika drive terlihat di BIOS, Anda mungkin perlu menginisialisasi disk dalam sistem operasi.
Untuk Windows:
Langkah 1: Pastikan bahwa drive telah dipasang dengan baik, lalu hidupkan sistem untuk melakukan boot ke Sistem Operasi Windows.
Langkah 2: Tekan tombol Windows + X, lalu pilih Manajemen Disk.
Langkah 3: Jika SSD masih baru dan belum diinisialisasi, jendela sembul akan muncul dengan pesan “Inisialisasi Disk”.
Langkah 4: Pilih antara:
MBR (Master Boot Record): Cocok untuk drive berkapasitas di bawah 2TB dan sistem operasi lama.
GPT (GUID Partition Table): Dianjurkan untuk sistem terbaru dan drive berkapasitas lebih dari 2TB.
Langkah 5: Klik OK untuk menginisialisasi disk.
Langkah 6: Setelah terinisialisasi, status SSD akan menjadi “Unallocated" (Tidak dialokasikan). Klik kanan pada disk, lalu pilih New Simple Volume (Volume Baru Biasa).
Langkah 7: Ikuti perintah di layar untuk memformat dan menetapkan huruf drive untuk SSD.
Untuk Mac OS:
Langkah 1: Pastikan drive terpasang dengan baik, hidupkan sistem, lalu boot ke Mac OS.
Langkah 2: Buka Utilitas Disk (dapat ditemukan dengan menggunakan Spotlight dengan tombol Cmd + spasi lalu mengetikkan “Disk Utility”).
Langkah 3: Di panel kiri, pilih SSD Anda.
Langkah 4: Klik Hapus.
Langkah 5: Berikan nama pada drive, lalu pada menu Format, pilih:
APFS untuk perangkat SSD dan Mac yang lebih baru.
Mac OS Extended (Journaled) untuk sistem atau HDD yang lebih lama.
Langkah 6: Klik Hapus. Setelah proses ini selesai, SSD akan siap digunakan.
Untuk Linux:
Langkah 1: Pastikan drive terpasang dengan baik, hidupkan sistem, lalu boot ke Linux OS.
Langkah 2: Buka terminal.
Langkah 3: Ketikkan perintah sudo fdisk -l untuk menampilkan semua drive yang terhubung. Identifikasikan SSD Anda dari ukurannya dan catat nama perangkatnya, mis., /dev/sdb.
Langkah 4: Lakukan inisialisasi SSD menggunakan perintah fdisk atau parted. Berikut panduan dasar penggunaan perintah fdisk:
Ketikkan perintah sudo fdisk /dev/sdb (ganti /dev/sdb dengan nama perangkat SSD Anda).
Tekan "g" untuk membuat tabel partisi GPT baru.
Tekan "n" untuk membuat partisi baru. Ikuti perintah untuk menentukan ukuran dan jenis.
Tekan "w" untuk mengonfirmasikan dan menyimpan perubahan ke disk.
Langkah 5: Format partisi baru pada SSD (mis., /dev/sdb1). Anda dapat memformatnya dengan menggunakan sistem file pilihan Anda:
Untuk ext4: sudo mkfs.ext4 /dev/sdb1
Untuk ext3: sudo mkfs.ext3 /dev/sdb1
Untuk FAT32: sudo mkfs.vfat /dev/sdb1
Langkah 6: Lakukan mount SSD:
Buat titik mount: sudo mkdir /mnt/myssd
Lakukan mount SSD: sudo mount /dev/sdb1 /mnt/myssd
Jangan lupa mengganti nama /dev/sdb1 dengan nama partisi SSD Anda.
FAQ: KSD-012010-001-15
Jika SSD Anda memerlukan firmware baru, Anda akan menerima notifikasi saat menjalankan perangkat lunak Kingston SSD Manager, yang ada di sini: www.kingston.com/ssdmanager
FAQ: KSD-012010-001-11
https://www.kingston.com/blog/pc-performance/nvme-vs-sata
FAQ: KSD-012010-001-19
FAQ: KSD-012010-001-04
Jika SSD Anda memerlukan firmware baru, Anda akan menerima notifikasi saat menjalankan perangkat lunak Kingston SSD Manager, yang ada di sini: www.kingston.com/ssdmanager
FAQ: KSD-012010-001-11
FAQ: KSD-012010-001-12
FAQ: KSD-012010-001-13
FAQ: KSD-012010-001-14
FAQ: KSD-012010-001-04
Disabling Windows 10/11 Power Save
NOTE: You will need to complete the following steps once for each drive plugged into your computer.
1. Log in as a local administrator on your computer.
NOTE: If you are not an administrator on Windows, you will receive a warning indicating you won’t be able to make changes when you open Device Manager. Please contact your
administrator for further assistance if required.
2. Unlock your VP80ES drive.
3. Right click the Start button and select “Device Manager”.
4. Click on the arrow next to “Universal Serial Bus controllers”.
5. Right click on “USB Mass Storage Drive”.
6. Click “Properties”.
7. Click the “Power Management” tab.
8. Uncheck “Allow the computer to turn off this drive to save power”.
9. Click OK and close the “Device Manager” window.
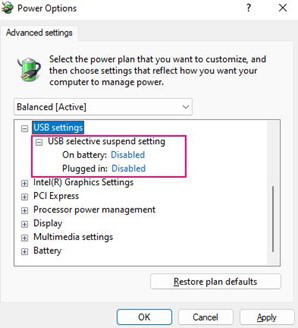
Disabling Windows 10/11 Selective Suspend
1. In the search box on the taskbar, type control panel.
2. Click and Open Control Panel.
3. Click on Hardware and Sound.
4. Click on Power Options.
5. Click the Change plan settings link for the plan you’re currently using.
6. Click the Change advanced power settings link.
7. Click (+) next to “USB settings”.
8. Click (+) next to “USB selective suspend setting”.
9. Select “Disabled” from the drop-down menu.
NOTE: If you are using a device with a battery (i.e., laptop or tablet), you will need to set this for On Battery and Plugged in.
10. Click Apply to save settings and click OK.
You’re All Set!
If the steps above resolved your problem, you’re all set!
If you still experience lock-ups, proceed to the trouble-shooting tips below.
(Trouble-shooting Tips)
I’ve completed the steps above, but my VP80ES continues to lock after short periods of inactivity. What else can I do?
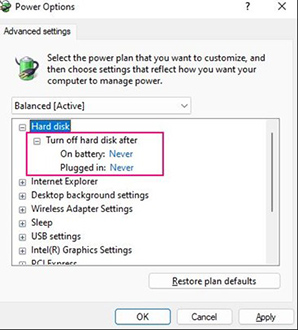
If you have a high capacity IronKey VP80ES (e.g., 2TB and above), you may also need to disable the Hard Disk power save option to prevent the drive from locking unexpectedly. See steps 1-10 below.
Disabling Windows 10/11 Turn off hard disk power save
1. In the search box on the taskbar, type control panel.
2. Click and Open Control Panel.
3. Click on Hardware and Sound.
4. Click on Power Options.
5. Click the Change plan settings link for the plan you’re currently using.
6. Click the Change advanced power settings link.
7. Click (+) next to “Hard Disk”
8. Click (+) next to “Turn off hard disk after”
9. Click the down button Set both “On Battery” and “Plugged in” options to “Never”
10. Click Apply to save settings and click OK.
FAQ: KSD-002202-011.01
Jika drive terlihat di BIOS, Anda mungkin perlu menginisialisasi disk dalam sistem operasi.
Untuk Windows:
Langkah 1: Pastikan bahwa drive telah dipasang dengan baik, lalu hidupkan sistem untuk melakukan boot ke Sistem Operasi Windows.
Langkah 2: Tekan tombol Windows + X, lalu pilih Manajemen Disk.
Langkah 3: Jika SSD masih baru dan belum diinisialisasi, jendela sembul akan muncul dengan pesan “Inisialisasi Disk”.
Langkah 4: Pilih antara:
MBR (Master Boot Record): Cocok untuk drive berkapasitas di bawah 2TB dan sistem operasi lama.
GPT (GUID Partition Table): Dianjurkan untuk sistem terbaru dan drive berkapasitas lebih dari 2TB.
Langkah 5: Klik OK untuk menginisialisasi disk.
Langkah 6: Setelah terinisialisasi, status SSD akan menjadi “Unallocated" (Tidak dialokasikan). Klik kanan pada disk, lalu pilih New Simple Volume (Volume Baru Biasa).
Langkah 7: Ikuti perintah di layar untuk memformat dan menetapkan huruf drive untuk SSD.
Untuk Mac OS:
Langkah 1: Pastikan drive terpasang dengan baik, hidupkan sistem, lalu boot ke Mac OS.
Langkah 2: Buka Utilitas Disk (dapat ditemukan dengan menggunakan Spotlight dengan tombol Cmd + spasi lalu mengetikkan “Disk Utility”).
Langkah 3: Di panel kiri, pilih SSD Anda.
Langkah 4: Klik Hapus.
Langkah 5: Berikan nama pada drive, lalu pada menu Format, pilih:
APFS untuk perangkat SSD dan Mac yang lebih baru.
Mac OS Extended (Journaled) untuk sistem atau HDD yang lebih lama.
Langkah 6: Klik Hapus. Setelah proses ini selesai, SSD akan siap digunakan.
Untuk Linux:
Langkah 1: Pastikan drive terpasang dengan baik, hidupkan sistem, lalu boot ke Linux OS.
Langkah 2: Buka terminal.
Langkah 3: Ketikkan perintah sudo fdisk -l untuk menampilkan semua drive yang terhubung. Identifikasikan SSD Anda dari ukurannya dan catat nama perangkatnya, mis., /dev/sdb.
Langkah 4: Lakukan inisialisasi SSD menggunakan perintah fdisk atau parted. Berikut panduan dasar penggunaan perintah fdisk:
Ketikkan perintah sudo fdisk /dev/sdb (ganti /dev/sdb dengan nama perangkat SSD Anda).
Tekan "g" untuk membuat tabel partisi GPT baru.
Tekan "n" untuk membuat partisi baru. Ikuti perintah untuk menentukan ukuran dan jenis.
Tekan "w" untuk mengonfirmasikan dan menyimpan perubahan ke disk.
Langkah 5: Format partisi baru pada SSD (mis., /dev/sdb1). Anda dapat memformatnya dengan menggunakan sistem file pilihan Anda:
Untuk ext4: sudo mkfs.ext4 /dev/sdb1
Untuk ext3: sudo mkfs.ext3 /dev/sdb1
Untuk FAT32: sudo mkfs.vfat /dev/sdb1
Langkah 6: Lakukan mount SSD:
Buat titik mount: sudo mkdir /mnt/myssd
Lakukan mount SSD: sudo mount /dev/sdb1 /mnt/myssd
Jangan lupa mengganti nama /dev/sdb1 dengan nama partisi SSD Anda.
FAQ: KSD-012010-001-15
FAQ: KSD-012010-001-18
FAQ: KSD-012010-001-04
Jika hal tersebut tidak memungkinkan, atau jika sebelumnya Anda telah mengklonakan data lama Anda ke drive baru tersebut, pastikan bahwa drive baru tersebut muncul sebagai perangkat boot di BIOS sistem, lalu pilih drive tersebut untuk proses boot.
FAQ: KSD-012010-001-03
FAQ: KSD-012010-001-14
FAQ: KSD-012010-001-13
FAQ: KSD-012010-001-12
Jika SSD Anda memerlukan firmware baru, Anda akan menerima notifikasi saat menjalankan perangkat lunak Kingston SSD Manager, yang ada di sini: www.kingston.com/ssdmanager
FAQ: KSD-012010-001-11
FAQ: KSD-012010-001-18
Jika drive terlihat di BIOS, Anda mungkin perlu menginisialisasi disk dalam sistem operasi.
Untuk Windows:
Langkah 1: Pastikan bahwa drive telah dipasang dengan baik, lalu hidupkan sistem untuk melakukan boot ke Sistem Operasi Windows.
Langkah 2: Tekan tombol Windows + X, lalu pilih Manajemen Disk.
Langkah 3: Jika SSD masih baru dan belum diinisialisasi, jendela sembul akan muncul dengan pesan “Inisialisasi Disk”.
Langkah 4: Pilih antara:
MBR (Master Boot Record): Cocok untuk drive berkapasitas di bawah 2TB dan sistem operasi lama.
GPT (GUID Partition Table): Dianjurkan untuk sistem terbaru dan drive berkapasitas lebih dari 2TB.
Langkah 5: Klik OK untuk menginisialisasi disk.
Langkah 6: Setelah terinisialisasi, status SSD akan menjadi “Unallocated" (Tidak dialokasikan). Klik kanan pada disk, lalu pilih New Simple Volume (Volume Baru Biasa).
Langkah 7: Ikuti perintah di layar untuk memformat dan menetapkan huruf drive untuk SSD.
Untuk Mac OS:
Langkah 1: Pastikan drive terpasang dengan baik, hidupkan sistem, lalu boot ke Mac OS.
Langkah 2: Buka Utilitas Disk (dapat ditemukan dengan menggunakan Spotlight dengan tombol Cmd + spasi lalu mengetikkan “Disk Utility”).
Langkah 3: Di panel kiri, pilih SSD Anda.
Langkah 4: Klik Hapus.
Langkah 5: Berikan nama pada drive, lalu pada menu Format, pilih:
APFS untuk perangkat SSD dan Mac yang lebih baru.
Mac OS Extended (Journaled) untuk sistem atau HDD yang lebih lama.
Langkah 6: Klik Hapus. Setelah proses ini selesai, SSD akan siap digunakan.
Untuk Linux:
Langkah 1: Pastikan drive terpasang dengan baik, hidupkan sistem, lalu boot ke Linux OS.
Langkah 2: Buka terminal.
Langkah 3: Ketikkan perintah sudo fdisk -l untuk menampilkan semua drive yang terhubung. Identifikasikan SSD Anda dari ukurannya dan catat nama perangkatnya, mis., /dev/sdb.
Langkah 4: Lakukan inisialisasi SSD menggunakan perintah fdisk atau parted. Berikut panduan dasar penggunaan perintah fdisk:
Ketikkan perintah sudo fdisk /dev/sdb (ganti /dev/sdb dengan nama perangkat SSD Anda).
Tekan "g" untuk membuat tabel partisi GPT baru.
Tekan "n" untuk membuat partisi baru. Ikuti perintah untuk menentukan ukuran dan jenis.
Tekan "w" untuk mengonfirmasikan dan menyimpan perubahan ke disk.
Langkah 5: Format partisi baru pada SSD (mis., /dev/sdb1). Anda dapat memformatnya dengan menggunakan sistem file pilihan Anda:
Untuk ext4: sudo mkfs.ext4 /dev/sdb1
Untuk ext3: sudo mkfs.ext3 /dev/sdb1
Untuk FAT32: sudo mkfs.vfat /dev/sdb1
Langkah 6: Lakukan mount SSD:
Buat titik mount: sudo mkdir /mnt/myssd
Lakukan mount SSD: sudo mount /dev/sdb1 /mnt/myssd
Jangan lupa mengganti nama /dev/sdb1 dengan nama partisi SSD Anda.
FAQ: KSD-012010-001-15